Vegan 100 recipes: From Kentucky fried chick’n to salted caramel pretzel bars
Since 2016, Gaz Oakley has been showcasing his avant garde vegan recipes on Instagram, proving no vegan shall miss out on irresistible looking food, as his new book, Vegan 100, proves
Sign up to IndyEat's free newsletter for weekly recipes, foodie features and cookbook releases
Get our food and drink newsletter for free
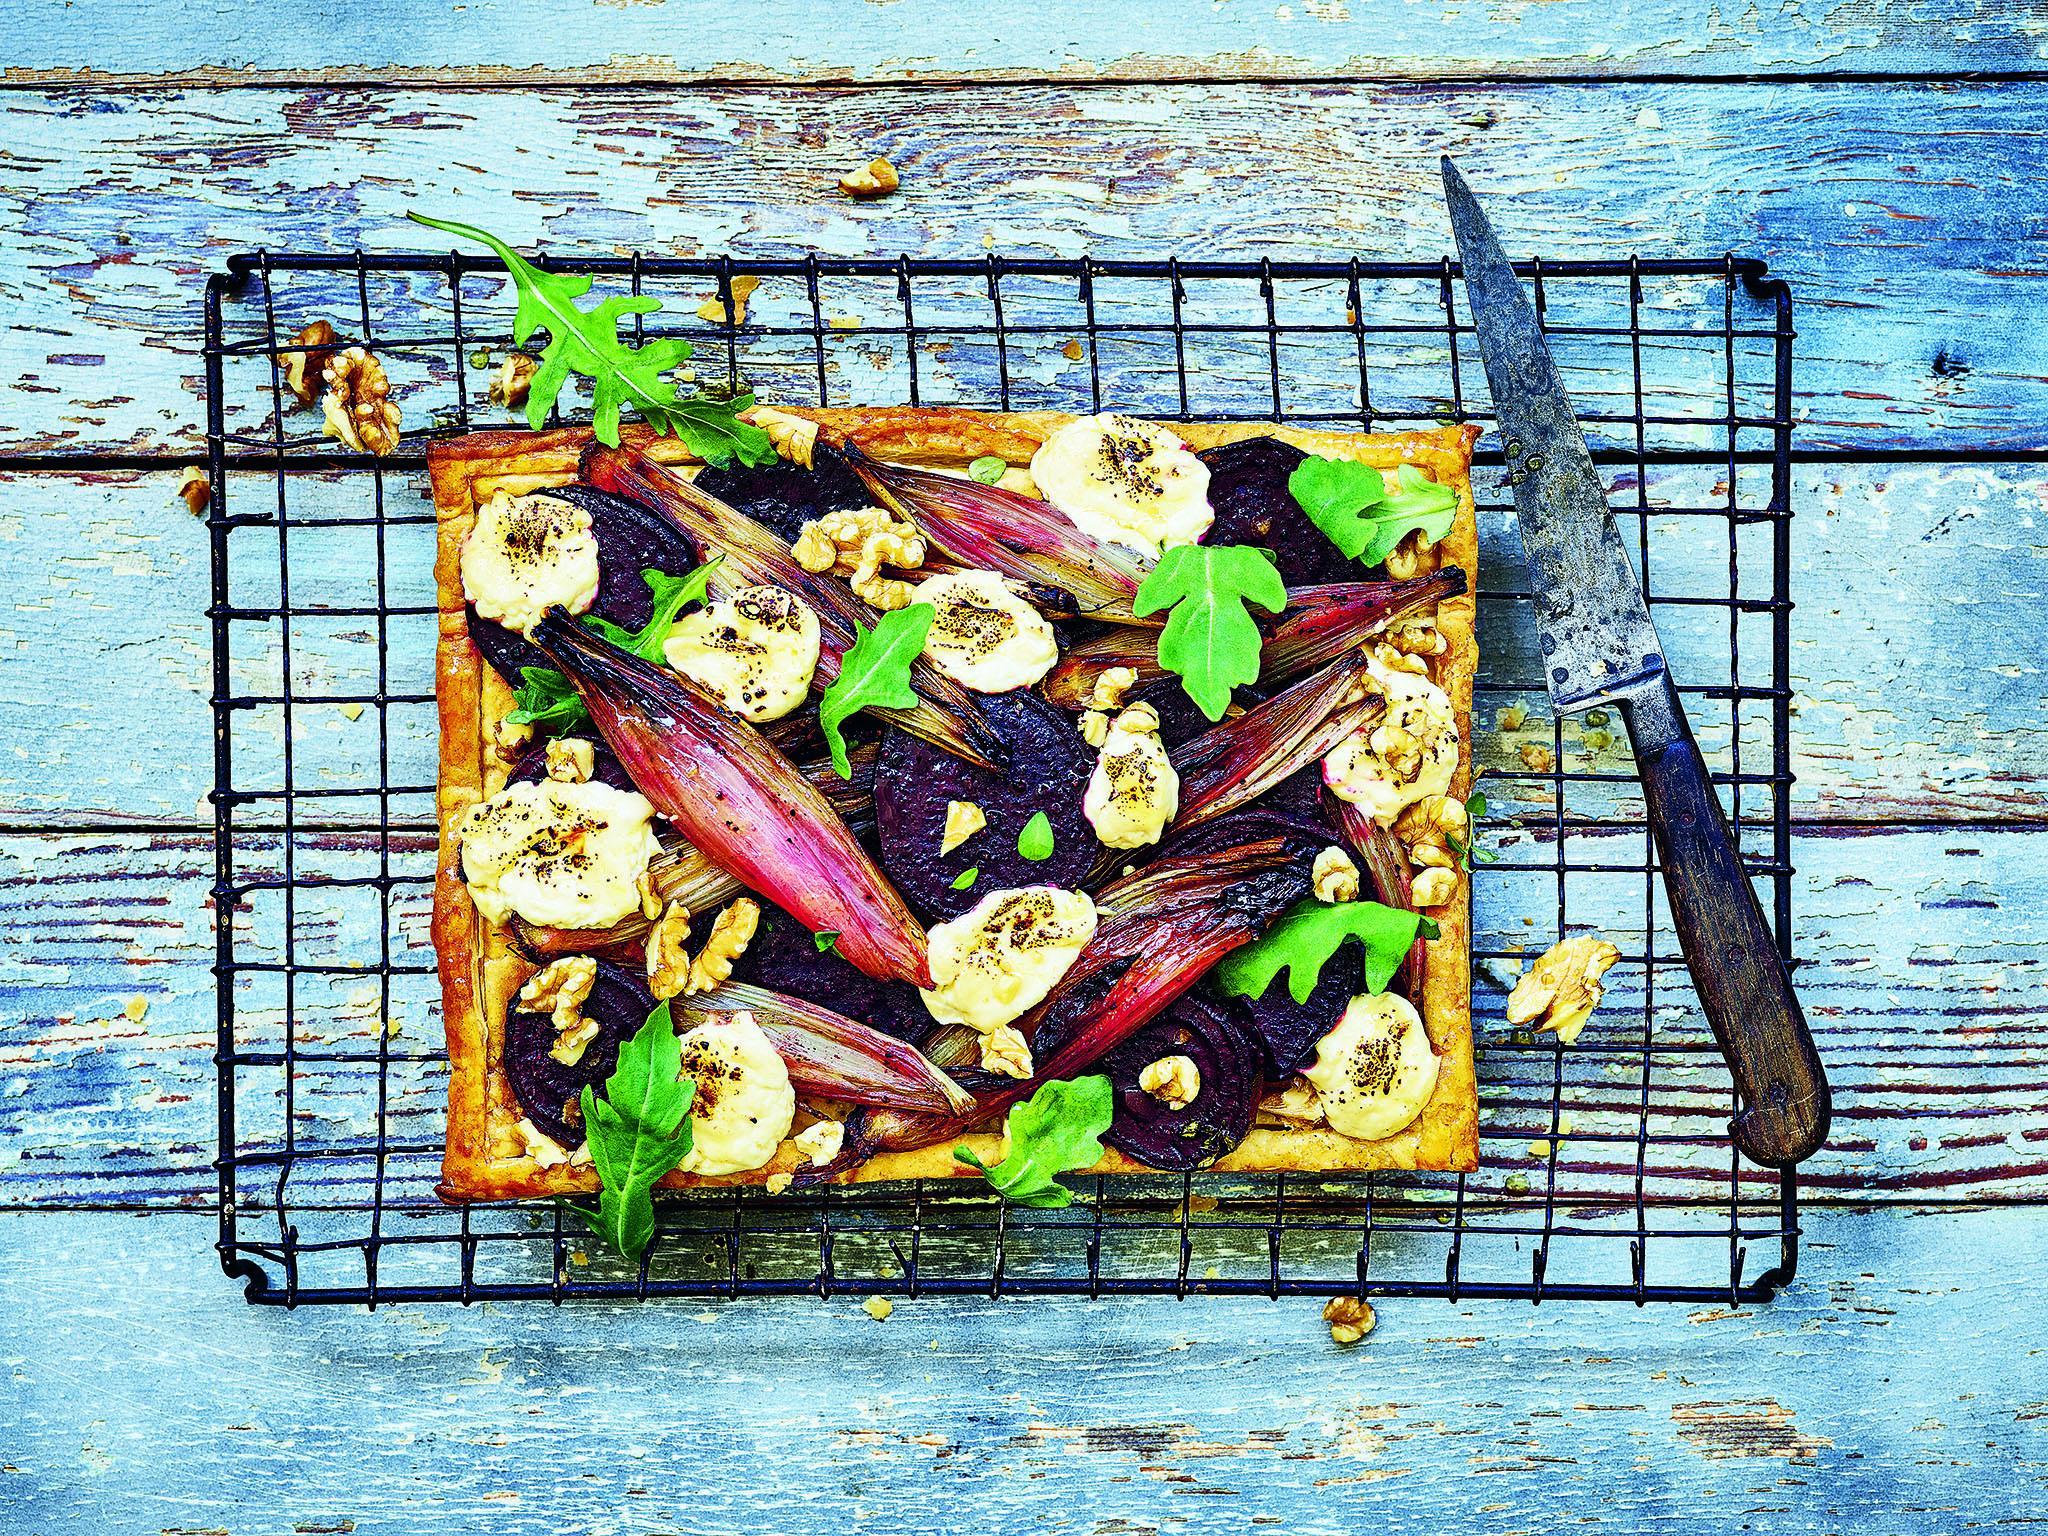
Roasted balsamic beetroot and shallot tarts
Beetroot and balsamic are a match made in heaven, and with my flaky puff pastry they’re incredible. Add some of my “Cream Cheese” for an extra delight.
Serves 4 generously
5 beetroots, peeled and sliced into 1-cm discs
6 shallots, peeled and halved lengthways
4 sprigs fresh thyme
3 tbsp balsamic vinegar
2 tbsp extra virgin olive oil pinch sea salt and pepper
400g rough puff pastry (see page below), or shop bought vegan puff pastry
40g walnuts
3 tbsp "cream cheese” *
fresh rocket, to serve
For the pastry glaze
2 tsp agave nectar
2 tbsp extra virgin olive oil
2 tbsp almond milk **
Preheat the oven to 180˚C (350˚F) and line two baking trays with greaseproof paper. Place the beetroot slices, shallots and thyme on one of the baking trays. Drizzle over the vinegar and olive oil, then season. Mix it all together so that everything is coated, then bake in the oven for 30–35 minutes, or until the vegetables are tender.
Meanwhile, prepare your pastry. It’s up to you what size your tart will be but I like to make two big ones. Roll the pastry into a large rectangle around 3mm (1/8 inch) thick. Cut the pastry into two neat rectangles around 15 x 20cm (6 x 8 inches). Transfer the pastry onto the baking tray and lightly score a rough border with a sharp knife, approximately 2cm (3/4 inch) from the edge, all the way round. Prick over the middle with a fork, leaving the border untouched.
Midway through cooking the beetroot, place the pastry sheet/s into the oven on the shelf below, to lightly cook for 8–10 minutes. The border should puff up nicely. Once the pastry and vegetables are cooked, use a palette knife to neatly place the beetroot and shallots in the middle of the pastry, then sprinkle over the walnuts and cheese.
Mix the ingredients for the pastry glaze together in a small bowl and brush over the pastry around the border. Transfer the tarts back into the oven to cook for a further 10 minutes, until beautiful and golden. Serve with a little rocket sprinkled on top.
Rough puff pastry
It’s actually uncommon to see a non-vegan chef making their own homemade puff pastry these days but it was one of the first things I learned to make when I became a chef at 15. This rough vegan version is much simpler to make – you will wow your friends when you tell them you have made this delightful flaky pastry.
Sift the flour and salt into a large bowl. Add the butter in small chunks and lightly rub the butter in. You want to still see the butter pieces so don’t over-rub. Make a well in the centre and pour in enough water to form into a dough. Cover the bowl and place it in the fridge to rest for around 15 minutes. Lightly flour your clean work surface, then knead the pastry into a rectangle shape. Roll the dough in one direction until it’s approximately three times longer than the original rectangle – around 20 x 50cm (8 x 20 inches) will do – keeping the edges nice and square.
Fold the top end into the centre, then the other end over the top. Turn the pastry 90 degrees, then repeat the process. I do this three times, turning 90 degrees between each roll and fold. Chill the pastry for 20 minutes before rolling out and cooking. (Or you can store in the fridge for two days or freeze for up to 2 months until you want to use it.)
*Cream cheese
There’s nothing I love more than this cream cheese spread on a warm bagel with a few cherry tomatoes or avocado on top. Perfect. It’s so simple to make and will keep in the fridge for 2–3 days but it’s so tasty and indulgent, half the time I’ve eaten the majority of it before it’s even got to the fridge!
Makes about 250g
115g raw cashew nuts
120ml cashew milk
2 tbsp nutritional yeast flakes
1 tbsp lemon juice
pinch sea salt and white pepper
¼ tsp dried onion granules
First up, “quick soak” the nuts: simply pop them in a heatproof container and pour over boiling water. Leave for around 20 minutes to soften while you measure out the other ingredients. Drain the water from the nuts and tip them into a high-speed blender. Add the rest of the ingredients and blend for 15 seconds. You will probably need to scrape down the sides and give everything a little stir, then blend again until smooth.
The smoother this cheese is the better, so add a little more milk if you think it needs it. Once smooth, spoon the mixture into a lidded container and keep refrigerated.
** Milk
Not only is homemade milk much tastier than shop-bought, non-dairy milk, making your own is healthier, more cost-effective and super-easy. I like to know exactly what’s in the food I’m eating so I make a couple batches of milk each week; I generally use blanched almonds or cashew nuts.
Makes 1 litre
125g blanched almonds or cashews OR 100g rolled oats
1 litre ice-cold filtered water
4 Medjool dates, pitted (an optional sweetener, or a little agave nectar or maple syrup to taste)
pinch sea salt
pinch ground cinnamon or grated nutmeg (optional)
Soak the nuts in cold water for at least 8 hours or overnight. I usually soak the nuts before going to bed ready to make the milk in the morning. If you are using oats you do not need to soak them – oat milk is ideal if you need milk quickly!
The next morning, drain away the soaking water, then tip the nuts into a high-speed blender with the cold filtered water and sweetener (if using). Make sure your water is super-cold as the blender will generate some heat which will spoil some of the nutrients if the milk mixture gets warm when blending. Blend until smooth.
Next grab a large jug or container and a milk bag or cheese cloth (or, if you don’t have either, a clean tea towel will work perfectly). Secure your cloth over the container and pour the milk mixture through. Squeeze all the excess liquid out of the mixture, until you’ve gotten every last speck of liquid out. Then you’re done – you should be left with a beautiful fresh batch of the finest milk. Stir in the sea salt, and the cinnamon or nutmeg if using. Keep the milk in the fridge in a clean covered container for up to 3 days.
Don’t just stop at nut and oats. I often make milk with shelled hemp seeds: use the same measurements, don’t soak the hemp seeds beforehand, and swap the filtered water for coconut water.
Kentucky fried chick’n
These seitan chick’n pieces are tender as hell! I coat them in a wonderful spicy batter that will rival any. They become super-crispy if fried but you can also bake them. If you are short of time you can also use the same batter technique with cauliflower florets.
Serves 4
For the chick’n – wet:
170g firm tofu
120ml soy milk
1 tsp miso paste
1 tsp dried tarragon
1 tsp dried sage
½ tsp onion powder
¼ tsp garlic powder
1 tsp sea salt
For the chick’n – dry:
115g seitan (vital wheat gluten)
25g chickpea flour
For the broth
1 litre vegetable stock
1 sprig fresh rosemary
2 sprigs fresh thyme
1 onion, quartered
pinch sea salt and pepper
For the Kentucky coating
120g plain (all-purpose) flour
60g panko breadcrumbs
2 tbsp unrefined caster sugar
1 tsp sea salt
2 tsp cracked black pepper
1 tbsp cayenne pepper
1 tbsp dried chilli flakes
1 tbsp dried oregano
1 tbsp paprika
1 tbsp dried sage
1 tsp ground allspice
For the batter
100g chickpea flour
240ml water
1 litre vegetable
oil, for frying
First up, you will need to make the chick’n pieces. Combine all the wet ingredients in a blender and blitz until smooth. Put the dry ingredients in a large mixing bowl and mix well. Add the wet mix to the bowl and stir until the mixture forms a dough. Turn the dough out onto a clean work surface lightly floured with chickpea flour.
Knead the dough for at least 8 minutes. This is the most important part of the recipe. If you don’t knead it properly, you will be left with horrible, spongy seitan. (I have gone as far as pounding the seitan dough with my fists!) Once kneaded, the dough will be quite firm and elastic. Form it into a rectangle around 1cm (3/8 inch) thick and cut it into 4. Set aside to rest for 10 minutes whilst you prepare the cooking broth. Add all the broth ingredients to a large, lidded saucepan and bring to a boil, then turn the heat down so that the broth is just lightly simmering.
Add the seitan pieces to the broth and pop the lid on. Simmer the seitan pieces for 35 minutes in the simmering broth (do not let it boil). Flip the seitan pieces over halfway through cooking. After the 35 minutes, remove the seitan pieces from the broth and set aside to cool. They should have almost doubled in size and feel quite meaty. Once cool, tear or cut them into smaller pieces ready to be covered in the Kentucky coating. I like to tear the pieces as this creates rough edges for the coating to cling on to.
For the Kentucky coating, stir all the ingredients together in a mixing bowl. For the batter, mix the chickpea flour and water together in a separate bowl. Now it’s time to individually dip the seitan pieces – first into the chickpea batter then into the coating. I double dip them to make sure they have a nice thick coating. Once you’ve coated all of the pieces, put them on a plate in the fridge while you heat the oil. If you’re using a deep-fat fryer, set it to 180˚C (350˚F). Alternatively, pour the oil into a large saucepan but don’t fill it more than half full.
To test if the oil is hot enough in the saucepan, drop a cube of bread into the oil – if it floats to the top straight away, the oil is ready. Carefully fry the chick’n pieces for 3–4 minutes, or until golden and crisp. If you’d prefer to bake the chick’n pieces, bake for 25 minutes in an oven set at 180˚C (350˚F). Once cooked, transfer to a plate lined with kitchen paper to soak up any excess oil. Serve immediately.
Salted caramel pretzel, almonds and cacao bars
Makes 12–14
For the almond “biscuit” layer:
70g macadamia nuts
40g coconut flakes
3 tbsp agave nectar
3 tbsp coconut oil
1 tbsp peanut and almond butter ***
pinch Himalayan salt
170g ground almonds
For the salted date caramel layer
340g pitted medjool dates
2 tbsp coconut oil
240ml almond
Milk (see page 12)
120ml filtered water
1 tsp vanilla bean paste
¼ tsp Himalayan salt
For the “chocolate” coating
5 tbsp coconut oil, melted
4 tbsp organic cacao powder
2 tbsp agave nectar
For the topping
gluten-free pretzels, or flaked
almonds (for 100 per cent raw)
Rich and indulgent. These salted-caramel bars are 100 per cent raw (without the pretzels) and only contain natural sugars, but they are definitely still a treat. Dates are a great energy food and are high in fibre, calcium and iron, plus so much more. Line a square, loose-bottom 20-cm (8-inch) baking tray with greaseproof paper.
First make the almond biscuit layer: blitz all of the ingredients, except the ground almonds, in the blender until the nuts and coconut are finely chopped. Add the ground almonds then pulse until fully incorporated. The mixture should be sticky. Press the almond mixture into the base of the baking tray, making sure it’s an even layer all over. Pop the tray into the freezer and get on with the caramel layer.
Rinse out the blender. Blitz all the ingredients in the blender until the mixture is as smooth as possible. Remove the tray from the freezer and spread the caramel layer over the top evenly. Pop the tray back into the freezer to set for around 2 hours.
After the 2 hours, remove the tray from the freezer, carefully remove the bar from the tin, then cut it into 12–14 bars. Run your knife under hot water between each cut to make it easier.
Place the bars onto a baking tray and back into the freezer while you make the coating. Mix the chocolate coating ingredients together in a small mixing bowl until smooth. Remove the bars from the freezer and drizzle the coating over the top of each bar. Top each bar with a couple of pretzels or a sprinkling of flaked almonds. Serve straight away or store in the freezer for up to 2 months. Serve straight from the freezer.
*** Peanut and almond butter
Once you make this you will never buy shop-bought nut butters again! It is so simple to make and with just a few ingredients you can achieve that creamy, nutty spread. I like my nut butter to have a roasted flavour but if you prefer to keep it raw, skip the roasting step.
Makes a 227g jar
125g (1 cup) raw shelledand skinned peanuts
125g (1 cup) blanched almonds
1 tbsp peanut oil (or a flavourless oil of your choice)
pinch sea salt
1 tbsp agave nectar or maple syrup (optional)
Line a baking tray with baking parchment and preheat the oven to 180˚C (350˚F). Spread the peanuts almonds out on the tray and roast in the oven for 8 minutes, or until golden brown. Tip the nuts into a high-speed blender and have a spatula to hand. Blend the nuts into a fine crumb-like consistency. This will take a couple minutes of stoppingand starting when you will have to scrape the nuts from the side of the blender.
Once you have fine crumbs they will start to clump together and all you need to do is add the oil, salt and agave or maple syrup (if using). Give it one final mix and you should be left with creamy peanut and almond butter. Easy as that! Try adding 1 tbsp cacao powder and 1 tsp vanilla for a sweet twist.
Vegan 100 by Gaz Oakley (Quadrille, £20) Photography © Simon Smith
Subscribe to Independent Premium to bookmark this article
Want to bookmark your favourite articles and stories to read or reference later? Start your Independent Premium subscription today.
Join our commenting forum
Join thought-provoking conversations, follow other Independent readers and see their replies