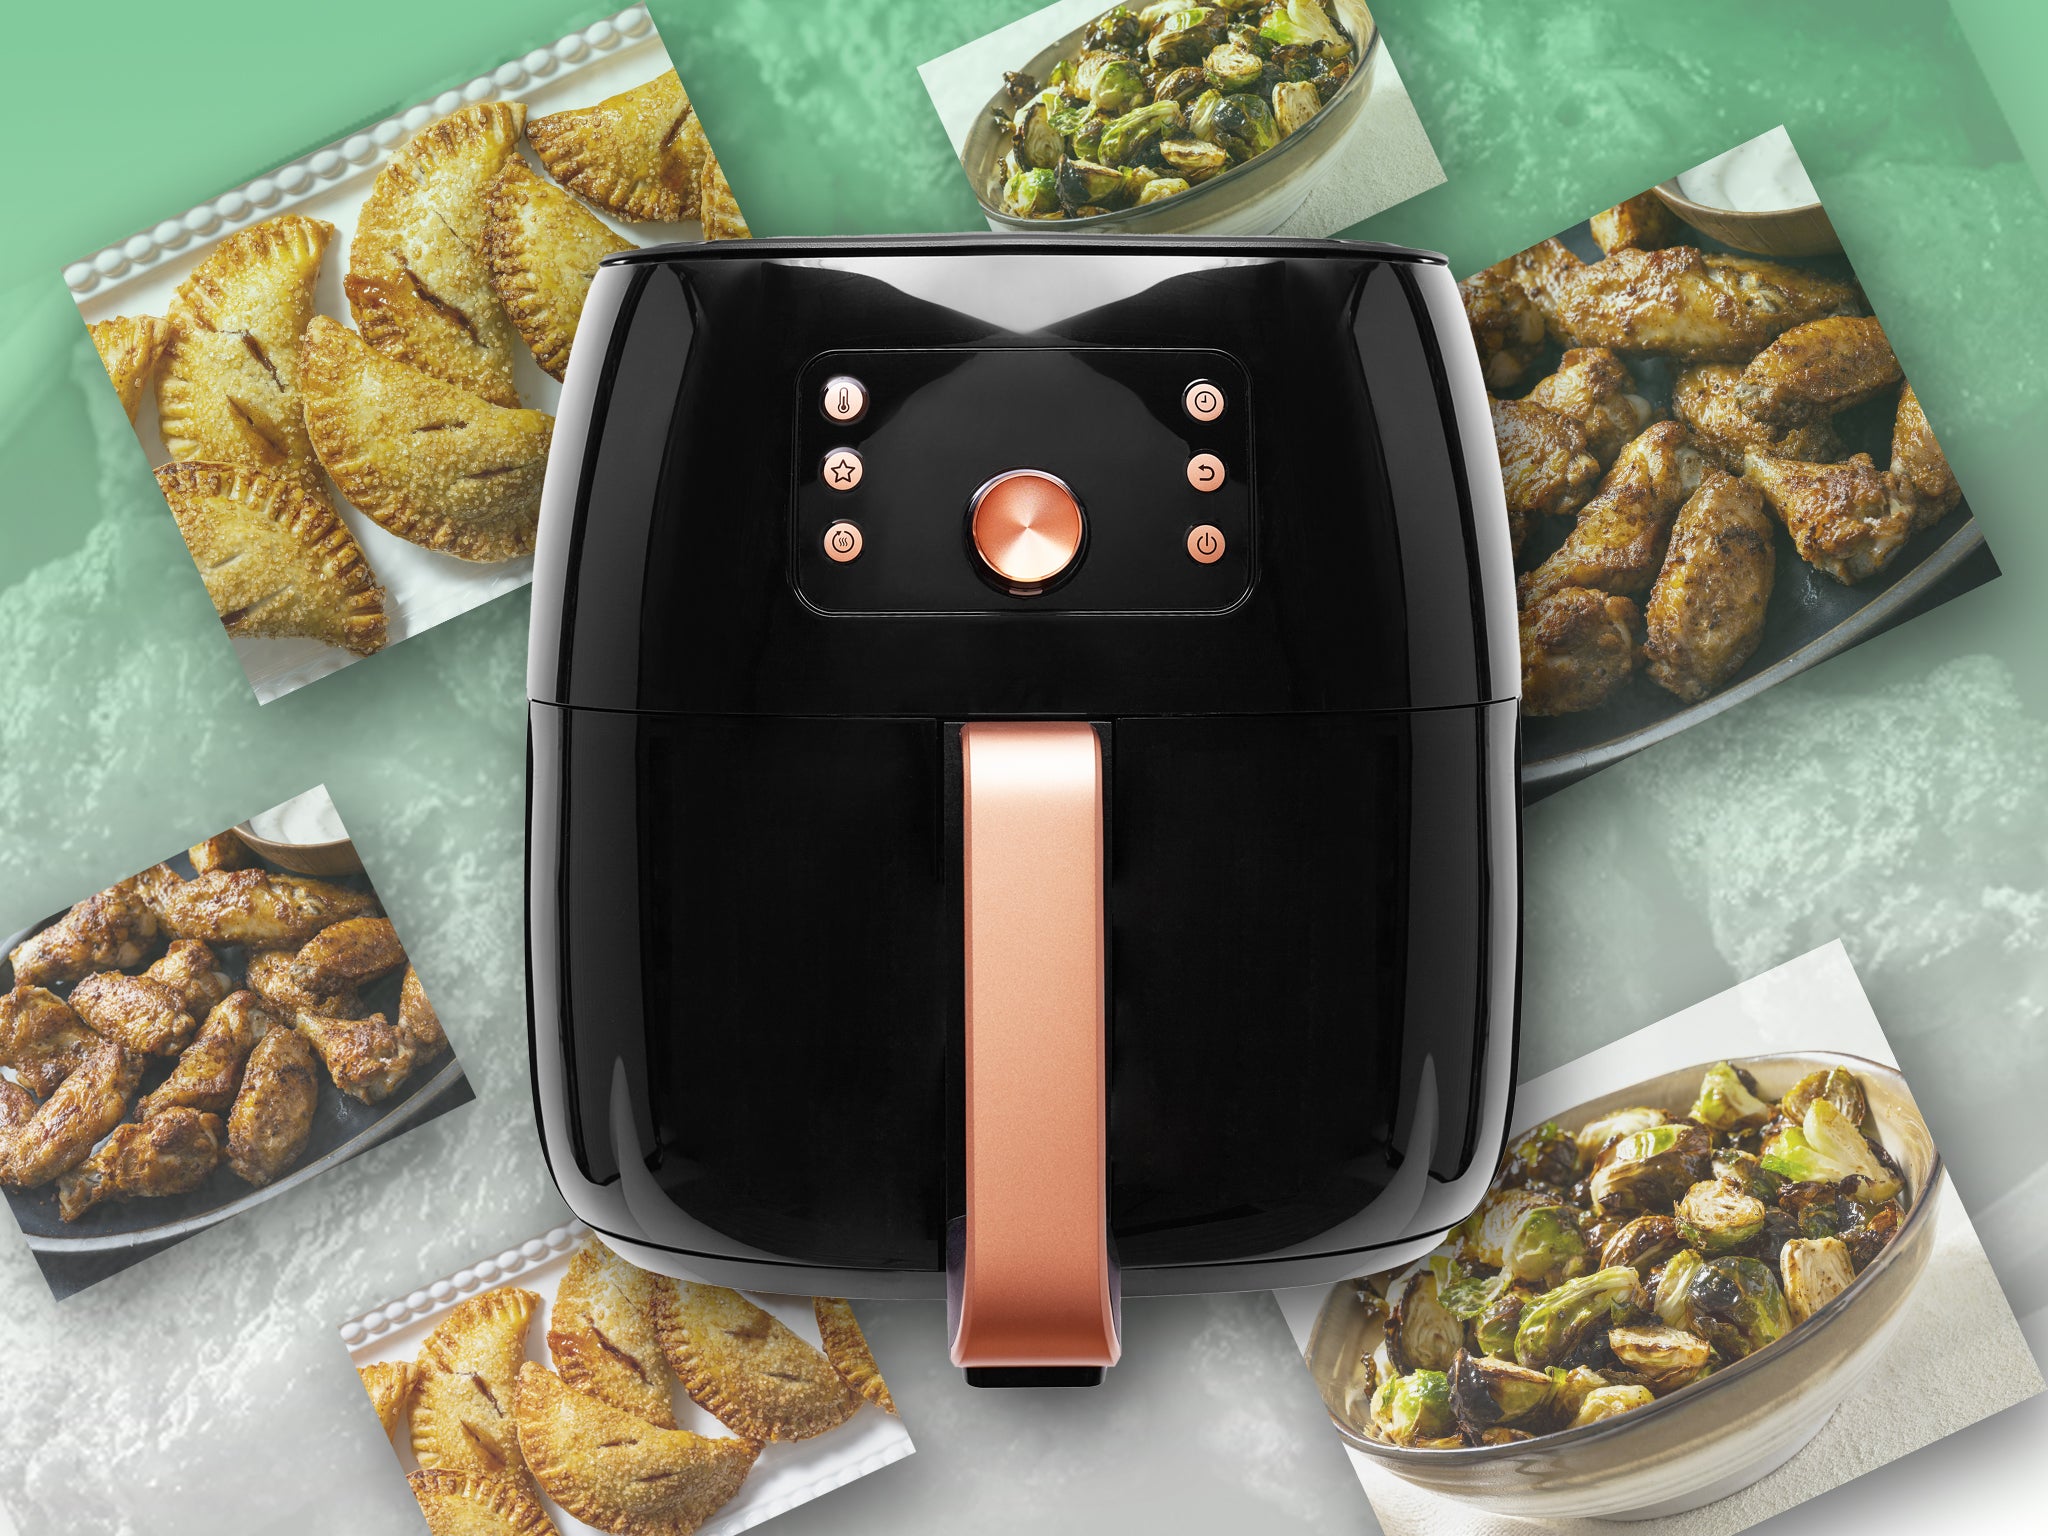
I was an air fryer sceptic – now I can’t stop using it
At the end of last year, Aaron Hutcherson finally caved and bought an air fryer. Now, after months of experimenting, he’s ready to eat his words: I, too, am an air fryer fan, he admits
Sign up to IndyEat's free newsletter for weekly recipes, foodie features and cookbook releases
Get our food and drink newsletter for free
Kitchen storage is a precious commodity. It’s one of my top concerns when considering adding a gadget or appliance to my arsenal, along with utility and price. For instance, I don’t own a toaster (I don’t eat toast that often, and there are other ways to prepare it when I do), nor have I invested in a pressure cooker or multicooker (I like being able to take a peek at my food while it’s cooking).
So when the air fryer entered the market and started gaining traction, I was sceptical. After all, “it’s just a small convection oven!” I proclaimed. And the hordes of devotees shouting from the rooftops how much they loved it and telling others, “You have to get an air fryer!” felt like a cult, which only made me resist it more.
We have Fred van der Weij to thank for the invention of the air fryer; the Dutch inventor was on a quest for crispy french fries without much oil or hassle. “The first attempt was rustic, nothing more than a box of pale wood with a metal cooking bowl that he handcrafted himself around 2006,” food writer Cynthia Greenlee said on the topic. He later patented his technology and pitched it to electronics maker Philips, which introduced it to the public in 2010. Much of the initial marketing, I remember, focused on fat – how the air fryer needed little to no additional fat to cook up crisp foods – which shoved the appliance into the diet fad section of my brain and closed the door behind it. But a pandemic sales boom, caused by masses of people needing to learn how to cook for themselves, made the appliance harder to ignore.
Thanks to the prodding of readers and the internet at large asking for more air fryer recipes – and accepting that the new appliance is here to stay – I finally caved to the pressure and bought one for myself at the end of 2022.
And now, dear reader, after months of experimenting and developing recipes, I am ready to eat my words and admit that I, too, am an air fryer fan.
While it is “just a small convection oven”, size matters. Its reduced size makes it more efficient at cooking compared with the convection function of a regular oven. This means browner, crisper food in a shorter amount of time. Speaking my love language, people raved about how good air fryer chicken wings are, and now I don’t know if I will ever make them another way.
With the air fryer, I can also quickly revive leftovers to almost the same texture as when they were freshly made; use it as the toaster I refuse to purchase; and cook crispy, golden tater tots and other frozen prepared foods in a matter of minutes. (My air fryer has gotten lots of use after nights out on the town.)
Its small capacity makes it more energy-efficient than standard-size ovens when cooking meals for only one or two. And as we enter summer in the northern hemisphere, air fryers – and countertop appliances in general – won’t heat up your kitchen as much as a standard oven. Now I’m freer to roast vegetables and make hand pies all year round.
If you, too, are new to the world of air frying or are looking for more helpful ideas, here are some rules and tips I’ve learned along the way to get the most out of the appliance. And check out my recipes for Brussels sprouts with honey-lemon vinaigrette, Old Bay chicken waings and apple pies.
Air fryer tips and tricks
1. Do not use nonstick cooking spray
Consider this your regular reminder that you should not use aerosol cans of cooking spray on nonstick cookware, which includes air fryer baskets. “Manufacturers warn that cooking oil spray can not only burn but also leave a sticky residue that can affect the release of food from the pan,” my colleague Becky Krystal tells me. However, spray bottles filled with oil are okay to use.
2. Preheating is not always necessary
As I’ve mentioned before, you do not always need to preheat your oven. One of the main reasons I skip this step with my regular-size oven is that it can take 20 to 30 minutes, which can feel like forever when preheating stands between me and dinner. The air fryer takes only a few minutes to preheat, plus the model I own doesn’t start the timer until it reaches the set temperature, so I typically just do it anyway. But if you decide to put food in the air fryer right away, it may take a few minutes longer for items to cook.
3. Cook food in a single layer, in batches
The air fryer is all about – well – air. Meaning, you need to allow for good airflow to create all the browning and crisping the appliance was designed for. As such, you don’t want to crowd the food in the basket too much, leaving space for the air to circulate. Depending on the size of your air fryer and the quantity of food you wish to cook, you may need to air fry in batches to achieve the best results.
4. Move the food for even cooking
While convection is more efficient than a standard oven, it’s still a good idea to shake or flip most items for more even cooking as the heat source is coming from above. I typically do this once about halfway through the cooking time. There’s no need to turn off the machine, as it automatically stops as soon as you pull out the basket and will restart when it’s returned.
5. Not all air fryers are created equal
In addition to size, strength among models can vary. Even in testing recipes at home and at the office, I noticed that the model at the office produced slightly browner food than the one at home. As such, you may need to adjust time or temperature from published recipes to achieve your desired results.
Air fryer recipes
Air fryer Brussels sprouts with honey-lemon vinaigrette
Total time: 25 minutes
Serves: 4
Brussels sprouts get beautifully browned and crisp when cooked in the air fryer. Here, they are simply seasoned and can be served as is, or you can drizzle the vegetables with a honey-lemon vinaigrette to make them truly shine.
Note: This recipe was tested in a 5.4-litre air fryer. Depending on the appliance you use, you may need to adjust the cooking time and/or temperature to achieve the desired results.
Storage: Refrigerate leftover for up to 4 days.
Substitutions: To make this vegan, use agave syrup instead of honey in the vinaigrette.
Ingredients:
For the Brussels sprouts:
450g Brussels sprouts, trimmed and halved (quartered if large)
1 tbsp extra-virgin olive oil
½ tsp fine salt
¼ tsp freshly ground black pepper
¼ tsp garlic powder
For the honey-lemon vinaigrette:
2 tbsp honey
2 tbsp fresh lemon juice (from about 1 lemon)
2 tbsp extra-virgin olive oil
⅛ tsp fine salt
⅛ tsp freshly ground black pepper
Method:
Make the Brussels sprouts: set the air fryer to 200C and preheat for about 5 minutes.
In a large bowl, toss the Brussels sprouts, olive oil, salt, pepper and garlic powder until evenly coated. Add the vegetables to the air fryer in an even layer and cook for 15 minutes, or until the Brussels sprouts are browned and crisp, shaking the basket halfway through. Transfer to a serving bowl or platter.
Make the honey-lemon vinaigrette: while the Brussels sprouts cook, in a small bowl, whisk together the honey, lemon juice, olive oil, salt and pepper until combined. Drizzle the vinaigrette over the Brussels sprouts and serve.
Air fryer Old Bay chicken wings
Total time: 30 minutes
Serves: 2 (makes about 10 pieces)
These air fryer chicken wings are easy, quick and irresistible. Borrowing a technique for crispy oven-baked chicken wings, the pieces are tossed with baking powder for enhanced browning and crisping. Old Bay, the seasoning blend founded in Baltimore and designed for seafood, lends its distinct flavour profile that includes celery salt, pepper, paprika and warming spices. The chicken wings are great as written below, or you could use this recipe as a blueprint to season them with your own spice blend and/or toss them with your favourite wing sauce.
Note: This recipe was tested in a 6-quart air fryer and a 5.8-quart air fryer. Depending on the appliance you use, you may need to adjust the cooking time and/or temperature to achieve the desired results.
Storage: Refrigerate leftovers for up to 3 days.
Ingredients:
450g chicken wings (drumettes and flats)
2 tsp Old Bay Seasoning
1 tsp baking powder
Blue cheese or ranch dressing, for serving
Method:
Set the air fryer to 200C and preheat for about 5 minutes.
Place the wings in a large bowl and pat dry. In a small bowl, whisk together the Old Bay Seasoning and baking powder to combine. Sprinkle the wings with the mixture and toss until evenly coated.
Once the fryer is ready, add the wings to the basket in a single layer evenly spaced out. Cook in batches if necessary; the wings can touch, but don’t overcrowd them. Close the basket and air fry for 25 minutes, turning the wings halfway through. Transfer to a shallow bowl or platter, and serve with blue cheese or ranch dressing for dipping.
Air fryer apple pies
Total time: 1 hour 15 minutes, plus 30 minutes cooling time
Serves: 12 (makes 12 pies)
Deep-frying pies made with homemade dough produces the tastiest results, but an air fryer and shop-bought pie dough make it so much easier to make them at home. These have a simple cinnamon-scented apple filling, and it’s important to let it cool before assembling the pies.
Note: This recipe was tested in a 6-quart air fryer and a 5.8-quart air fryer. Depending on the appliance you use, you may need to adjust the cooking time and/or temperature to achieve the desired results.
Make ahead: The uncooked pies can be placed on a rimmed baking tray lined with parchment, frozen until solid, transferred to a zip-top freezer bag or other airtight container, and stored in the freezer for up to 3 months. To air-fry from frozen, add 2 to 3 minutes to the listed cooking time.
Storage: Cool completely, then place in an airtight container and store at room temperature for up to 2 days or refrigerate for up to 1 week.
Ingredients:
55g packed light brown sugar
2 tbsp granulated sugar
1 tsp all-purpose flour, plus more for dusting
½ tsp ground cinnamon
⅛ tsp fine salt
2 tbsp unsalted butter
2 medium Granny Smith apples (340-400g total), peeled, cored and diced
1 package refirgerated pie crust or 1 homemade pie crust recipe (enough for a double-crust pie)
1 large egg, beaten
Demerara or turbinado sugar, for sprinkling
Method:
In a small bowl, whisk together the brown sugar, granulated sugar, flour, cinnamon and salt until combined; set aside.
In a medium saucepan over medium heat, melt the butter until foamy. Add the apples and cook, stirring occasionally, until they start to soften, about 5 minutes. Add the sugar mixture, stir to combine and bring to a boil. Cook, stirring occasionally, until the liquid thickens and coats the apples, about 7 minutes. Remove from the heat, transfer to a bowl and let cool for at least 30 minutes.
Lightly dust your work surface and rolling pin with flour. Roll out each pie crust to about a 30cm-wide circle, rotating and flipping and dusting with more flour as needed to prevent it from sticking. Using a 4-inch biscuit cutter (or a 10cm-wide plate or bowl and a paring knife), cut out 12 (10cm) circles. (You may need to gather and re-roll the scraps.)
For each pie, add about 1 tablespoon of the apple mixture to the centre of each circle, brush half the border with the egg, then fold the pastry over the top, seal in a half moon and crimp the edges with a fork. Transfer to a baking tray and repeat with the remaining pie crust and filling. (If freezing some or all of the pies for later, line the baking tray with parchment paper and freeze them at this point.)
Set the air fryer to 180C and preheat for about 5 minutes.
Brush the tops of the hand pies with the egg wash, sprinkle with demerara or turbinado sugar, and cut two small vents in the top of each.
Working in batches, add pies to the basket so that there is at least 2½cm of space between them and air fry for about 12 minutes, or until golden brown. Transfer to a platter, carefully wipe out the basket if there are any spills, and repeat with the remaining hand pies. Serve warm or at room temperature.
© The Washington Post
Subscribe to Independent Premium to bookmark this article
Want to bookmark your favourite articles and stories to read or reference later? Start your Independent Premium subscription today.
Join our commenting forum
Join thought-provoking conversations, follow other Independent readers and see their replies