Sign up to IndyEat's free newsletter for weekly recipes, foodie features and cookbook releases Get our food and drink newsletter for free
Being handed a box of chocolates and asked to choose one is my idea of confectionary Russian roulette. There are so many opportunities for it all to go wrong – anything with a fruit, cream or – heaven forbid – floral flavour makes me queasy simply thinking about it. I’m a chocolate puritan: I like it plain, with nuts, caramel and that’s about it.
Sure, sometimes there is a ‘handy’ diagram on the lid but is there really time? The unspoken message seems to be to pick a chocolate and pass the box on. Plus, I find the diagrams a bit enigmatic. Is that swirl on the top the sign of salted caramel (yes!) or violet crème (no!)?
I find it easier to mumble some excuse and pass the problem on to the next person. It’s why I like chocolate with the toppings on – well, on the top. You can see what you’re getting before your fingers commit to a course of action that your mouth may regret.
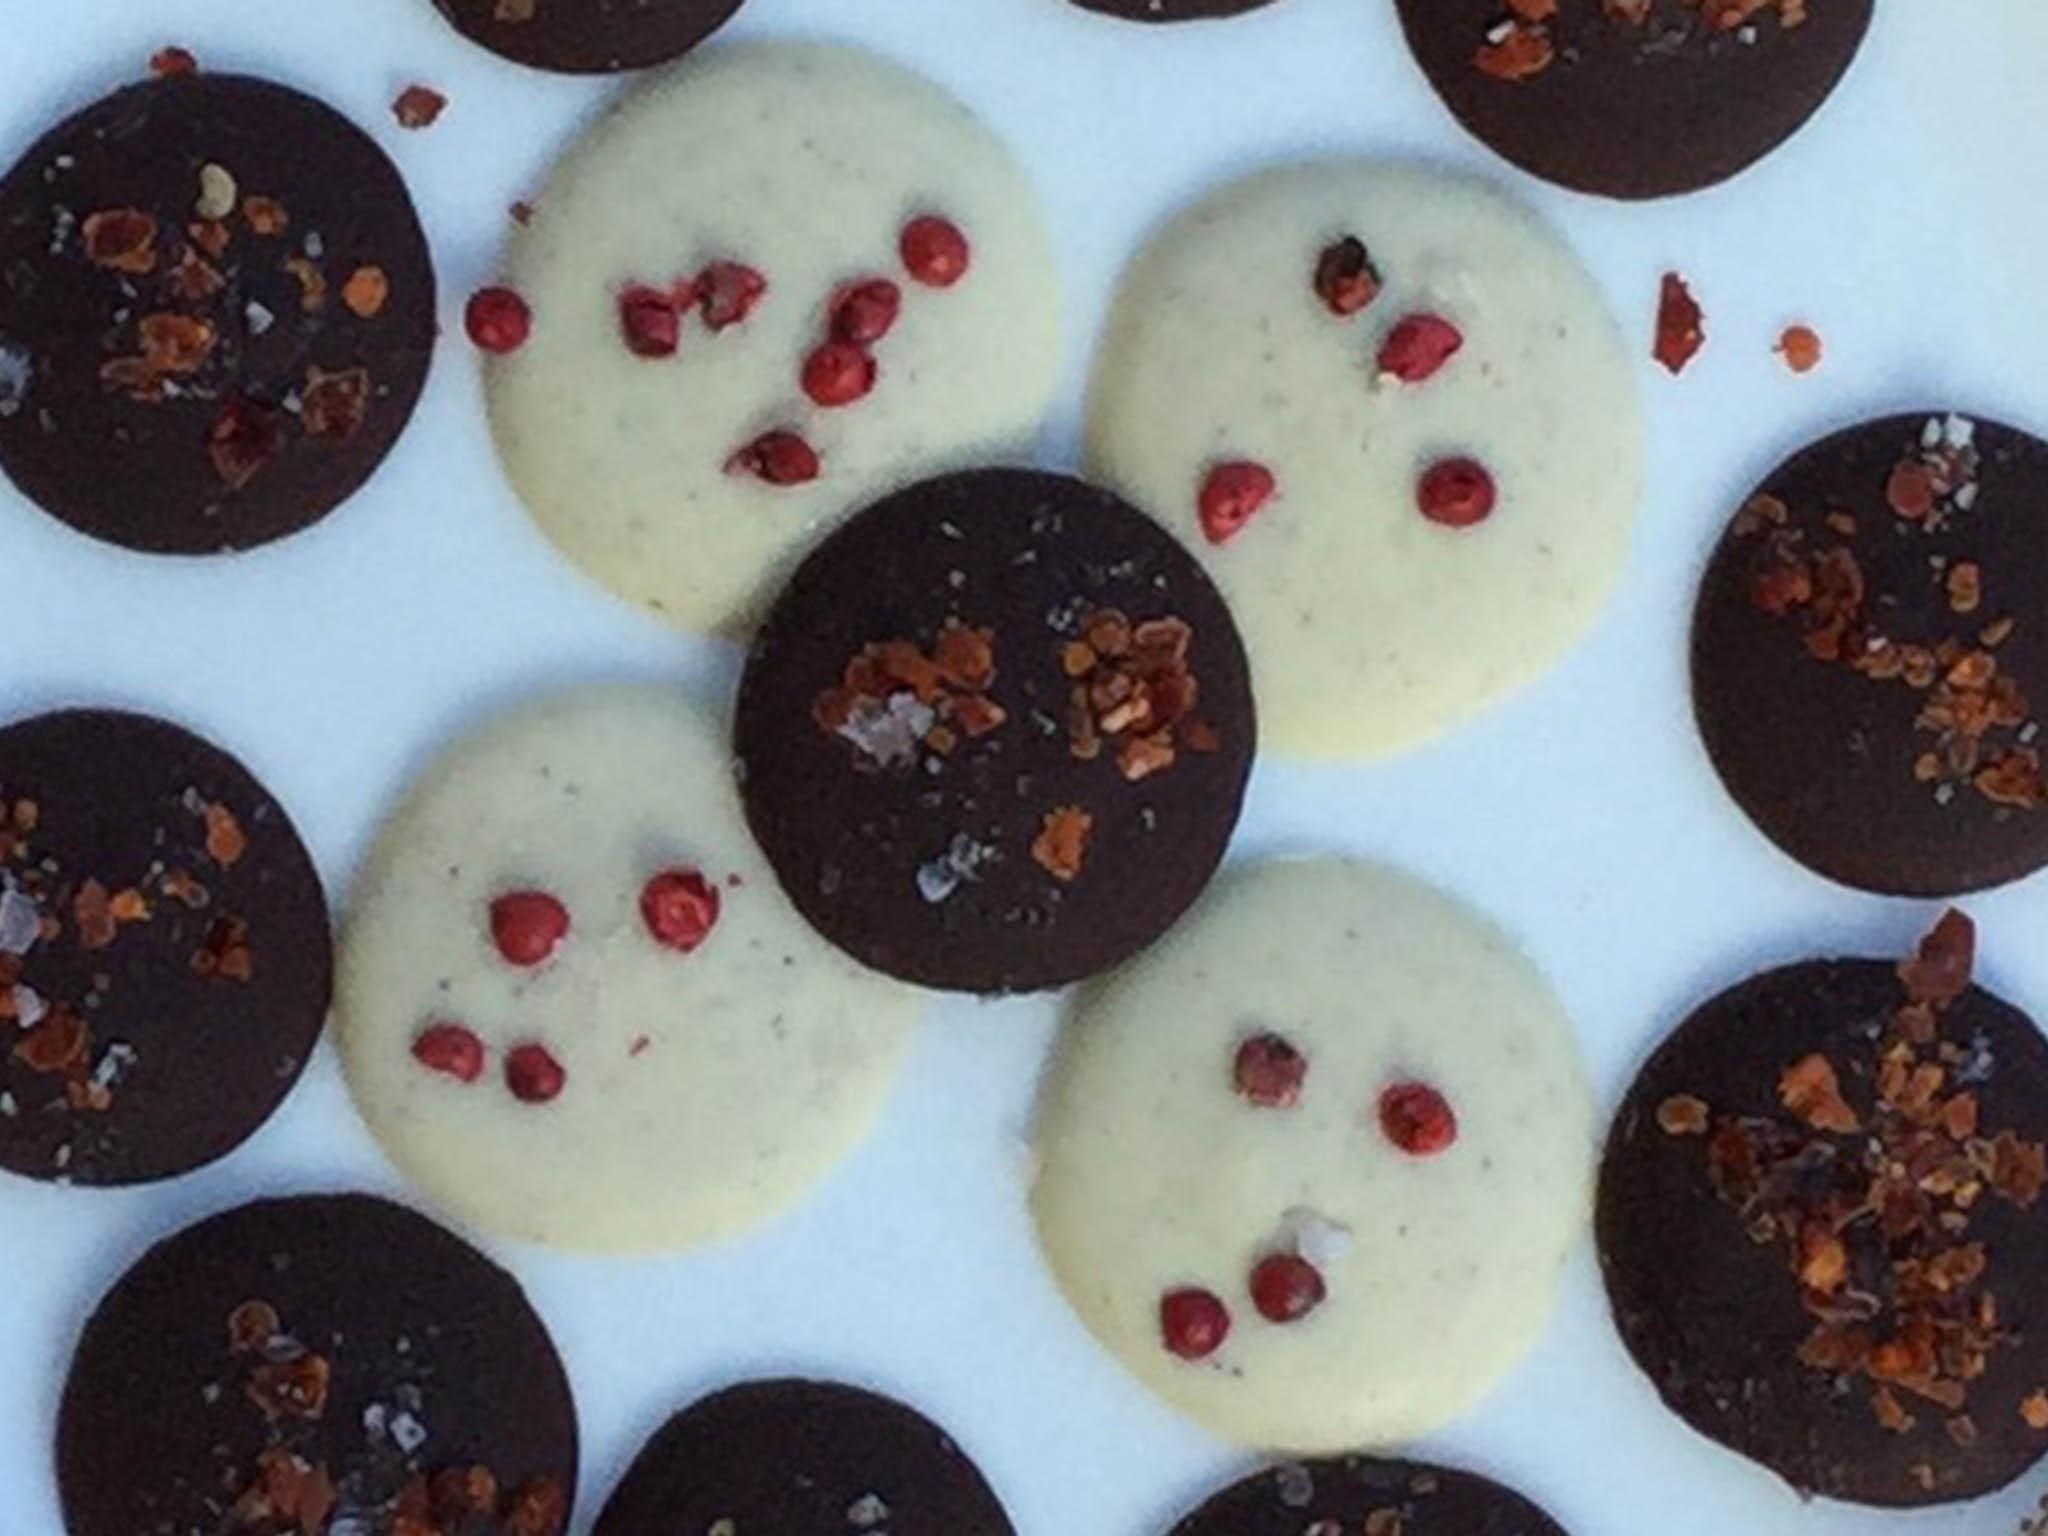
These chocolate buttons are simply kid’s chocolate with a grown up twist. They couldn’t be easier – simply melt the chocolate and pour it into rounds. The fun bit is adding the toppings. I’ve gone for dark chocolate with chilli pepper flakes (a natural partner with chocolate) or pink peppercorns with white chocolate, as a nod to Valentine’s Day. Both get a flick of crushed sea salt.
You could add nuts – chopped pistachios, bits of almond or even pine nuts would be a treat. You could even pour out the rounds and let your guests top their own, but on second thought that feels vaguely Stepford Wife-ish, so perhaps not. Either way, there’s no confusion and not a whiff of violets anywhere.
The simplicity of the buttons means you can choose whatever kind of toppings you prefer Chocolate buttons
The most challenging part of this – and trust me it’s not hard – is melting the chocolate. Chocolate doesn’t like water and it doesn’t like extreme heat, so don’t melt it at too high a temperature or for too long. And if you’re using the stove top bain marie method, ensure that no water gets into the chocolate.
Makes 20 white and 20 dark chocolate buttons
1 x 100g bar of white chocolate
Show all 35 Food and drink news Healthy living makes us more inclined to binge, research suggests Gluten-free breads, dairy-free milks and other plant-based products have been some of the most favoured foods in British supermarkets this year. However, while we’re busy filling our shopping trolleys with gluten-free goodness, we’re also jamming it with junk food and alcohol, new research suggests
Getty/iStock
Food and drink news Growing list of Vegan celebs Making the switch to veganism is a major lifestyle choice, one that many claim can improve energy levels, lower the risk of cardiovascular disease and clear up any skin issues. Beyoncé, Natalie Portman and Jessica Chastain are among the growing list of Hollywood stars who have eschewed animal products from their diets in recent years. There’s also been an increasing number of professional athletes who have gone vegan, such as boxing champions Mike Tyson and David Haye, thus debunking the myth that following a plant-based diet will leave you feeling weak and malnourished.
AFP/Getty/NARAS/iHeartMedia
Food and drink news McDonald's has announced the launch of a new vegan burger on its menu in Germany This will mark the first time the German franchise of the fast food chain has offered a vegan burger to its customers. The Big Vegan TS burger consists of a patty made from soy and wheat. It is served in a classic sesame seed bun, and contains salad, tomato, pickles and red onion.
McDonald's Germany
Food and drink news Drinking too many protein shakes could lead to an increased risk of obesity and a reduced lifespan, a new study has claimed Researchers from the University of Sydney's Charles Perkins Centre carried out an investigation to determine the impact excessive consumption of branched-chain amino acids (BCAAs) has on the body. BCAA supplements are often consumed in the form of powder, which is then added to water to make a shake. Published in journal Nature Metabolism, the study found that while BCAAs help to build muscle, they can also negatively impact an individual's temperament, cause weight gain and lead to a shortened lifespan
Getty Images/iStockphoto
Food and drink news Britain consumes more chocolate than any other country Most people love chocolate but it turns out no one does more than the Brits – with the average Brit found to have consumed 8.4 kg of chocolate in 2017, according to new data. Chocolate consumption around the world is on the rise, according to Mintel Global New Products Database (GNPD), which found that in the past year alone, Easter chocolate production has risen by 23 per cent
Food and drink news 'Easter eggs should be banned for children under four' Dr Becky Spelman, chief psychologist at Harley Street’s Private Therapy Clinic, is calling for Easter eggs to be banned for consumption for children under the age of four, claiming that giving them the opportunity to binge on chocolate so young will give them an unhealthy relationship with food later on. "This is a nightmare situation for parents of this generation as they have no idea how to teach their children to delay their response to cravings,” she said, explaining that too many young kids binge on these chocolates because their parents don’t know how to stop them. "Once a child starts overeating behaviour at a young age it’s very hard to turn things around for them in terms of food and their eating habits moving forward, leading to obesity from at very young age," she added
PA
Food and drink news Pineapple overtakes avocado as the UK's fastest-selling fruit According to Tesco, pineapple has overtaken avocado as the UK’s fastest-selling fruit, with sales increasing by 15 per cent in 2017. In comparison, avocado sales rose by just under 10 per cent last year. The popular supermarket says the surge in popularity comes as shoppers buying the versatile fruit are beginning to use it as a main ingredient in everything from curries and barbecues, to juices and cocktails
Getty
Food and drink news Marks & Spencers launches stoneless avocados Rather than the result of genetic modification, the avocados are formed by an unpollinated avocado blossom. The fruit develops without a seed which in turns stops the growth, creating a small, seedless fruit. What’s more, the skin is actually edible, unlike a regular avocado. The flesh is much like that of a normal avocado - smooth and creamy, pale in colour and rich in flavour
M&S
Food and drink news Office teabags contain 17 times more germs than a toilet seat, reveals study The average bacterial reading of an office teabag was 3,785, in comparison to only 220 for a toilet seat. Other pieces of kitchen equipment also stacked up highly in their findings, with the bacterial readings averaging at 2,483 on kettle handles, 1,746 on the rim of a used mug and 1,592 on a fridge door handle
Getty Images/iStockphoto
Food and drink news New study shows drinking more coffee leads to a longer life There is good news and a final hope for coffee addicts and lovers. You will now be able to drink coffee for longer as new study shows its can lead to a prolonged life. Scientists showed that those who drank between two and four cups of coffee a day had 18% lower risk of death compared to non-coffee drinkers.
PA
Food and drink news Coke Zero is replaced with Coke Zero Sugar Coca-Cola is pulling the plug on its Coke Zero. The much loved drink will be replaced with a ‘new improved taste’. The move, backed with a £10 million campaign, is said to come from Coca-Cola supporting people to reduce their sugar intake. Coca-Cola want people make this move while not sacrificing sugary taste of Coca-Cola.
Coca-Cola
Food and drink news Starbucks introduce new avocado spread The avocado craze has grown from hipster brunch restaurants to Starbucks. Starbucks have introduced their new avocado spread earlier this year and it has the internet in debate. Some argue that it not a spread but guacamole while others question if there is any avocado in there at all. When buying the new spread you can also buy an optional toasted bagel. It is a must try for all avocado connoisseurs.
Starbucks
Food and drink news New Mars chocolate bar The iconic British chocolate bar is about to get its partner in crime. The new bar, named Goodness Knows, will replace the gooey caramel goodness of the mars bar with oats. It is said to be more like a Florentine biscuit with a thin dark chocolate bottom. While being moderately healthy Mars says that is has ‘good intentions’. One pack has 154 calories and will sell for about 90p.
Mars
Food and drink news Wine prices could increase because of Brexit Wine lovers across the UK might soon have to shell out close to a quarter more for their favourite tipple after Brexit, as a weaker pound and sluggish economy takes its toll, a new study shows
Rex
Food and drink news Chocolate may be good for the heart A new study, published in the British Medical Journal: Heart, found that moderate chocolate intake can be positively associated with lessening the risk of the heart arrhythmia condition Atrial Fibrillation
Getty Images/iStockphoto
Food and drink news Brits throw away 1.4 million bananas each year British families are throwing away 1.4 million bananas that are perfectly good to eat every day at cost of £80m a year, new figures have shown
PA/Armin Weigel
Food and drink news Rosemary sales spike over exam time There has been a surge a surge in sales of the herb rosemary after a recent study found it helps improve memory. According to high street health food chain Holland & Barrett, sales of the herb have increased by 187 per cent compared to the same time last year
Getty Images/iStockphoto
Food and drink news Gluten-free diets 'not recommended' for people without coeliac disease Avoiding wheat, barley and rye in the belief that a gluten-free diet brings health benefits may do more harm than good, according to a team of US nutrition and medicine experts
Getty Images/iStockphoto
Food and drink news Starbucks launches two new coffee-based drinks Starbucks is launching two new coffee-based drinks in the UK, as it strives to tap into consumers’ growing appetite for healthy beverages. The Cold Brew Vanilla sweet cream and the Cappuccino Freddo, will both be available in stores throughout the UK from the start of May
Twitter/@SbuxCountyHall
Food and drink news Cadbury’s Dairy Milk Tiffin is making a permanent comeback after 80 years The Cadbury Dairy Milk Tiffin, first produced in 1937, is making a permanent comeback to the UK. The raisin and biscuit-filled chocolate bar is being launched after a successful trial last summer saw 3 million chocolate treats – at the cost of £1.49 for each 95g bar- purchased by nostalgic customers
Cadburys
Food and drink news Pizza restaurant makes ‘world’s cheesiest’ 'Scottie's Pizza Parlor' in Portland Oregon has created the world’s cheesiest pizza using a total of 101 different cheese varieties.
Facebook/Scottie's Pizza Parlor
Food and drink news A pizza joint in Portland Oregon has created the world’s cheesiest pizza using a total of 101 different cheese varieties. Why not eating before a workout could be better for your health A study published in the American Journal of Physiology by researchers at the University of Bath found you might be likely to burn more fat if you have not eaten first
Getty Images/iStockphoto
Food and drink news New York restaurant named best in the world A New York restaurant where an average meal for two will cost $700 has been named the best in the world. Eleven Madison Park won the accolade for the first time after debuting on the list at number 50 in 2010. The restaurant was praised for a fun sense of fine-dining, “blurring the line between the kitchen and the dining room”
Getty Images
Food and drink news Why you crave bad food when you’re tired Researchers at Feinberg School of Medicine, Northwestern University in Chicago recently presented their results of a study looking into the effects of sleep deprivation upon high-calorific food consumption. Researchers found that those who were sleep-deprived had “specifically enhanced” brain activity to the food smells compared to when they had a good night’s sleep
Shutterstock
Food and drink news Drinking wine engages more of your brain than solving maths problems Drinking wine is the ideal workout for your brain, engaging more parts of our grey matter than any other human behaviour, according to a leading neuroscientist. Dr Gordon Shepherd, from the Yale School of Medicine, said sniffing and analysing a wine before drinking it requires “exquisite control of one of the biggest muscles in the body”
Getty Images/iStockphoto
Food and drink news British dessert eating surges after people ditch healthy eating in February : In heartening news for anyone feeling guilty about quitting their New Year diet, it seems lots of us have given in to our sweet tooths once again. New data from nationwide food-delivery service Deliveroo reveals there was a surge in Brits ordering desserts in February compared to the first month of 2017
Getty Images/iStockphoto
Food and drink news US congress debates definition of milk alternatives A new bill has been created that seeks to ban dairy alternatives from using the term ‘milk’. Titled the DAIRY PRIDE Act, the name is a tenuous acronym for ‘defending against imitations and replacements of yogurt, milk, and cheese to promote regular intake of dairy every day’. It argues that the dairy industry is struggling as a result of all the dairy-free alternatives on the market and the public are being duped too
Getty Images
Food and drink news Cadbury’s launches two new chocolate bars UK confectionary giant Cadbury has launched two new chocolate bars, hoping to lure those with a sweet tooth and perhaps help combat some of the challenges it faces from rising commodity prices and a post-Brexit slump in the value of the pound.The company’s new products will be peanut butter and mint flavoured. They will be available in most major super markets as 120g bars, priced at £1.49, according to the company
Cadburys
Food and drink news You can now get a job as a professional chocolate eater The company responsible for some of your favourite chocolate brands – think Cadbury, Milks, Prince and Oreo – have officially announced an opening to join their team as a professional chocolate taster. The successful candidate will help them to test, perfect and launch new products all over the world.
Getty Images/iStockphoto
Food and drink news MSG additive used in Chinese food is actually good for you, scientist claims For years, we’ve been told MSG (the sodium salt of glutamic acid) - often associated with cheap Chinese takeaways - is awful for our health and to be avoided at all costs. But one scientist argues it should be used as a “supersalt” and encourages adding it to food.
Getty Images/iStockphoto
Food and drink news Lettuce prices are rising Not only are lettuces becoming an increasingly rare commodity in supermarkets, but prices for the leafy vegetables seem to be rising too. According to the weekly report from the Government’s Department for Environment, Food and Rural Affairs, a pair of Little Gem lettuces had an average market price of £0.86 in the week that ended on Friday, up from an average of £0.56 in the previous week – that’s an almost 54 per cent increase.
Getty Images
Food and drink news ‘Do-It-Yourself’ restaurant To encourage more people to cook and eat together, IKEA has launched The Dining Club in Shoreditch – a fully immersive ‘Do-It-Yourself’ restaurant . Members of the public can book to host a brunch, lunch or dinner party for up to 20 friends and family. Supported by their very own sous chef and maître de, the host and their guests will orchestrate an intimate dining experience where cooking together is celebrated and eating together is inspirational
Mikael Buck / IKEA
Food and drink news Ping Pong menu with a twist Gatwick Airport has teamed up with London dim sum restaurant Ping Pong to create a limited edition menu with a distinctly British twist; including a Full English Bao and Beef Wellington Puff, to celebrate the launch of the airport’s new route to Hong Kong
Food and drink news Zizzi unveil the Ma’amgharita Unique pizza art has been created by Zizzi in celebration of the Queen’s 90th birthday. The pizza features the queen in an iconic pose illustrated with fresh and tasty Italian ingredients on a backdrop of the Union Jack
Food and drink news Blue potatoes make a comeback Blue potatoes, once a staple part of British potato crops, are back on the menu thanks to a Cambridge scientist turned-organic farmer and Farmdrop, an online marketplace that lets people buy direct from local farms. Cambridge PhD graduate-turned farmer, Adrian Izzard has used traditional growing techniques at Wild Country Organics to produce the colourful spuds, packed with healthy cell-protecting anthocyanin, which had previously disappeared from UK plates when post-war farmers were pushed towards higher-yielding varieties
To garnish:
Red chilli pepper flakes
Other topping options:
Nuts (chopped pecans, pistachios, almonds or pine nuts)
There are two easy ways to melt chocolate. If you have a microwave, place the white chocolate in a heat proof jug and the dark chocolate in a second jug. Microwave one of the jugs for a minute. Stir and heat again at about at 15 second intervals. Stop microwaving when most of the chocolate is melted but there are still lumps. Remove from the microwave and stir until the chocolate is smooth.
Pour a small amount of the chocolate on to a silicone baking sheet placed in a sheet pan. I aim for around the size of a fifty pence coin. Repeat until you use up all the chocolate. If the chocolate starts to harden, you can microwave it again for 10 seconds. While the chocolate is still soft, garnish with whatever toppings you’re using plus crush a tiny bit of sea salt on to each one.
Repeat with the second chocolate. You can melt the chocolate on the stove too, using a bain marie or water bath. Bring a small amount of water to boil in a saucepan. Place a heat-proof bowl on top so it covers the opening of the pan completely but the bottom of the bowl doesn’t come into contact with the water. Stir until the chocolate is almost melted then remove the bowl from the pan and continue stirring until it’s completely melted and smooth. Pick up from the instructions in the second paragraph.
Once you’ve decorated the buttons, place the sheet pan somewhere cool (but not the refrigerator) to allow them to harden. When they’re hard, remove them from the silicone sheet and serve. Keep any leftovers in a sealed container in a cool, dry place.
Join our commenting forum
Join thought-provoking conversations, follow other Independent readers and see their replies