The definitive guide to making perfect, flaky croissants at home
Get those perfectly burnished, flaky pastries straight from your oven with Claire Saffitz’s expert advice

Does anything in the baking realm rival a fresh croissant, the way its burnished shell shatters, then yields to the silky, bready, layered interior?
Simply, the answer is no.
A pastry as miraculous as a croissant is, predictably, tricky to make at home. There is the lamination – the process of rolling and flattening butter into thin sheets between layers of dough – and the rolling and folding of that butter-layered dough, a technique called a “turn”. In professional settings, machines called slab rollers in temperature-controlled rooms laminate the dough quickly and effectively, producing light, flaky, uniform croissants. Home bakers, however, must complete these tasks by hand, making it harder, slower and much more variable.
Read more:
It’s a lot to take on, but none of that should dissuade you from trying. Anyone with even a passing interest in baking will feel pure elation upon pulling a baking sheet of puffed, burnished crescents from the oven. Once you master the basic dough, you can expand on your skills, adding fillings like chocolate or ham and cheese, or even repurposing leftover plain croissants as almond croissants. Getting to that point requires following a tight script, but many of the factors that determine success can be controlled in a home kitchen through some key techniques. And below are even more tips to help guide you smoothly and confidently through the process.
Mind your ingredients
Look to high-protein flour: A flour with an 11 per cent to 13 per cent protein content (usually noted on the bag) is necessary for a sturdy, gluten-rich dough that can support many layers of butter and withstand the rolling and folding required to create those layers. If you can find it, King Arthur all-purpose flour is ideal for two reasons: it has a relatively high protein content of 11.7 per cent, and it contains a small amount of malted barley flour, which professional bakers add to their croissant dough to produce a crispier, more flavourful exterior.
Pay attention to your yeast: Experienced bakers generally prefer to use fresh yeast – sometimes called cake yeast or baker’s yeast – when making croissants, as it’s more reliable than active dry yeast. However, active dry yeast is by far easiest for home bakers to find. You want to be confident that your yeast is alive, so keep it refrigerated and make sure it’s being used well before the expiration date. (If you have doubts, you may want to proof it: warm 120g of the total milk in the accompanying base recipe to about 40C, then combine it in a small bowl with the 2¼tsp/7g active dry yeast and stir until dissolved. Let it sit until the mixture is foamy, about 5 minutes, then proceed.)
Spring for the good butter: European butters contain at least 82 per cent butterfat by weight. Often, this increased fat content makes these butters richer in flavour and more “plastic”, or able to bend while cold without breaking. This relative flexibility will help the butter roll out more easily, eventually resulting in lighter, taller croissants with defined layers. Of all the butters I tested, I liked Kerrygold the best because it maintains a waxy, malleable texture even when cold, so the butter block resists cracking and splitting apart inside the dough during rolling.
Set yourself up for success
Clear your schedule and prepare your space: Be sure to budget two days for this project, with most of the active work taking place on the first day. Make every effort to work in a cool kitchen environment (20C to 22C), which will make rolling out the butter-laden dough and controlling fermentation much easier. Clear off several feet of counter space. Make room in the refrigerator, as well as room in the freezer for the dough. It’s important that the dough stay as cold as possible throughout the process, so minimise opening and closing the fridge and freezer doors.
… And your ingredients: Weigh all your ingredients for the dough (also called the détrempe), especially the flour, water and milk. The specific ratio of liquid to flour in the accompanying base recipe, called the “hydration”, produces a dough that’s the right texture for croissants – soft enough to roll out by hand, yet firm enough to keep the butter enclosed.
Nail the process
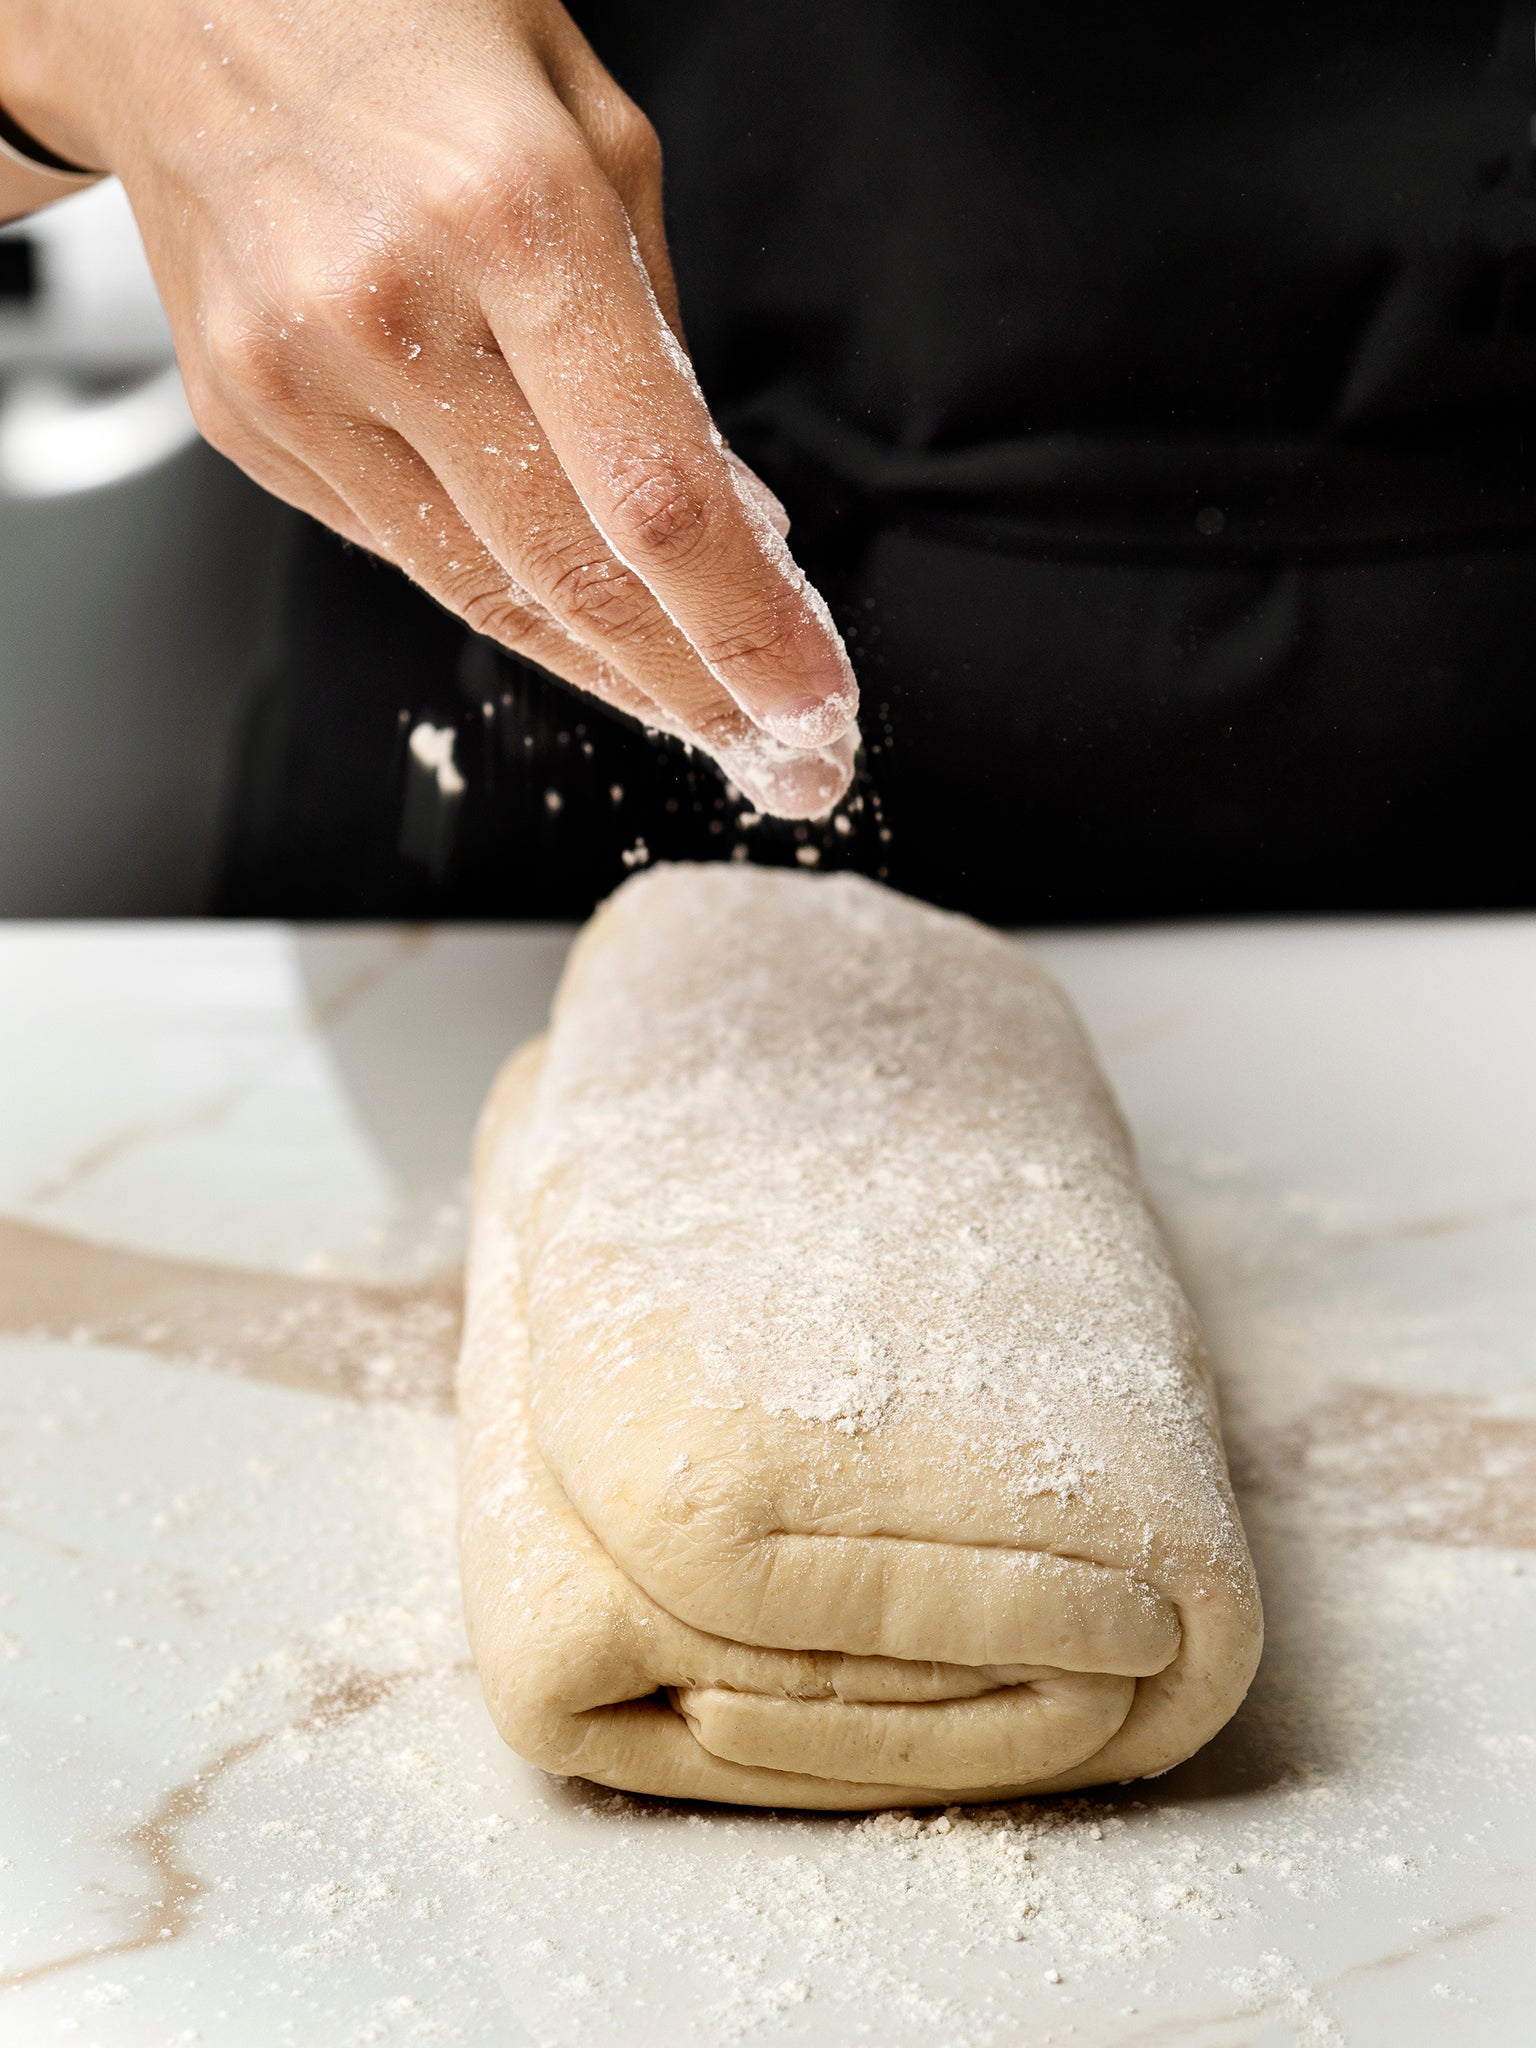
Keep your edges sharp: One of the most important factors in making bakery-quality croissants at home is also the trickiest: maintaining the dough’s squared-off edges and straight sides throughout the lamination process. What might seem like a minor issue early on – a lopsided butter block, for example – can compound down the line, so attention to detail is important. Sharp corners and straight sides help the dough align with itself as it’s folded during each turn, ensuring the croissants have the same number of layers and are a similar size. It’s a skill that takes practice, so understand that you might have difficulty on your first several tries, but, as long as you follow the other principles outlined here, a little unevenness or misalignment won’t ruin your croissants.
… Your dough cold: How well you control fermentation also largely determines your success. You’ll want to keep the dough as cold as possible to prevent the yeast from producing gases during lamination, but not so cold that the butter becomes too hard to roll out smoothly between the layers. Whenever the dough is out, try to work quickly to prevent it from warming and fermenting.
… And your cuts clean: For the most defined croissants, use a wheel cutter (either a pastry wheel or a pizza cutter) when cutting your dough. It slices cleanly, with minimal dragging or tearing. If you don’t have a wheel cutter, a sharp knife will suffice, or you can use a clean box cutter.
Look for proof: Sufficiently proofing croissants so they achieve maximum lightness takes patience and practice. It’s easy to undershoot. Poking the dough, the normal test a baker would use, isn’t an option because the risen dough is too delicate and will tear, disrupting the layers. The best indicators are visual: the dough will be so filled with gases from the yeast that the layers along the cut sides will have separated, and the surfaces will be rounded and very puffed – like little crescent-shaped Michelin men. When you gently shake the baking sheet, a proofed croissant will have a subtle wobble.
Apply the egg wash carefully: A combination of egg yolk and heavy cream produces glossy, bronzed outsides. While applying it, take care to avoid coating the exposed layers on the cut sides of the dough, as this will fuse them together. If you have lots of egg drips on the baking sheet, wipe them off, since these could burn while baking. Chilling the croissants uncovered while the oven heats helps firm them up so it’s easier to apply the egg wash, and dries out the surface of the dough, leading to a well-developed exterior.
Is making croissants at home an easy feat? Not in the least. But is it a fascinating and fun project? Certainly, even if you encounter some hiccoughs along the way. Know that the more times you make them, the better your croissants will turn out, but even a first attempt – provided you follow the suggestions and principles outlined here – will most likely produce a breathtaking, delicious result.
Croissants

This recipe is a detailed roadmap to making bakery-quality light, flaky croissants in your own kitchen. With a pastry as technical as croissants, some aspects of the process – gauging the butter temperature, learning how much pressure to apply to the dough while rolling – become easier with experience. If you stick to this script, buttery homemade croissants are squarely within your reach.
Makes: 8 croissants
Total time: 24 hours, largely unattended
Ingredients
For the détrempe (dough):
605g all-purpose or bread flour, plus more for dusting
66g granulated sugar
1tbsp plus ½tsp (about 12g) salt
2¼tsp (7g) active dry yeast
214g water, at room temperature
120g whole milk, at room temperature
57g unsalted butter, cut into 1.3cm pieces, chilled
For the butter block and assembly:
340g unsalted butter (3 sticks), chilled
All-purpose flour, for rolling
1 large egg yolk
1tbsp heavy cream
1. Twenty-four hours before serving, start the détrempe: in the bowl of a stand mixer fitted with the dough hook, combine the flour, sugar, salt and yeast, and stir to combine. Create a well in the centre, and pour in the water and milk. Mix on low speed until a tight, smooth dough comes together around the hook, about 5 minutes. Remove the hook and cover the bowl with a damp towel. Set aside for 10 minutes.
2. Reattach the dough hook and turn the mixer on medium-low speed. Add the butter pieces all at once and continue to mix, scraping down the bowl and hook once or twice, until the dough has formed a very smooth, stretchy ball that is not the least bit sticky, 8 to 10 minutes.
3. Form the dough into a ball and place seam-side down on a lightly floured work surface. Using a sharp knife, cut two deep perpendicular slashes in the dough, forming a “+”. (This will help the dough expand into a square shape as it rises, making it easier to roll out later.) Place the dough slashed-side up inside the same mixing bowl, cover with plastic wrap and let rise at room temperature until about 1½ times its original size, 45 minutes to 1 hour. Transfer the bowl to the refrigerator and chill for at least 4 hours and up to 12.
4. As the dough chills, make the butter block: place the sticks of butter side-by-side in the centre of a large sheet of parchment paper, then loosely fold all four sides of the parchment over the butter to form a packet. Turn the packet over and use a rolling pin to lightly beat the cold butter into a flat scant 1.3cm-thick layer, fusing the sticks and making it pliable. (Don’t worry about the shape at this point.) The parchment may tear. Turn over the packet and unwrap, replacing the parchment with a new sheet if needed. Fold the parchment paper over the butter again, this time making neat, clean folds at right angles (like you’re wrapping a present), forming an 20cm square. Turn the packet over again and roll the pin across the packet, further flattening the butter into a thin layer that fills the entire packet while forcing out any air pockets. The goal is a level and straight-edged square of butter. Transfer the butter block to the refrigerator.
5. Eighteen hours before serving, remove the dough from the refrigerator, uncover and transfer to a clean work surface. (It will have doubled in size.) Deflate the dough with the heel of your hand. Using the four points that formed where you slashed the dough, stretch the dough outward and flatten into a rough square measuring no more than 20 centimetres on one side.
6. Place 2 pieces of plastic wrap on the work surface perpendicular to each other, and place the dough on top. Wrap the dough rectangle, maintaining the squared-off edges, then roll your pin over top as you did for the butter, forcing the dough to fill in the plastic and form an 20cm square with straight sides and right angles. Freeze for 20 minutes.
7. Remove the butter from the refrigerator and the dough from the freezer. Set aside the butter. Unwrap the dough (save the plastic, as you’ll use it again) and place on a lightly floured surface. Roll the dough, dusting with flour if necessary, until 40cm long, maintaining a width of 20cm (barely wider than the butter block). With a pastry brush, brush off any flour from the surface of the dough and make sure none sticks to the surface.
8. You’re going to enclose the butter block in the dough and roll them out together. To ensure they do so evenly, they should have the same firmness, with the dough being slightly colder than the butter. The butter should be chilled but able to bend without breaking. If it feels stiff or brittle, let sit at room temperature for a few minutes. Unwrap the butter just so the top is exposed, then use the parchment paper to carefully invert the block in the centre of the dough rectangle, ensuring all sides are parallel. Press the butter gently into the dough and peel off the parchment paper. You should have a block of butter with overhanging dough on two opposite sides and a thin border of dough along the other two.
9. Grasp the overhanging dough on one side and bring it over the butter toward the centre, then repeat with the other side of the dough, enclosing the butter. You don’t need the dough to overlap, but you want the two sides to meet, so stretch it if necessary, and pinch the dough together along all seams so no butter peeks out anywhere. Lift the whole block and dust a bit of flour underneath, then rotate the dough 90 degrees, so the center seam is oriented vertically.
10. Orient the rolling pin perpendicular to the seam and lightly beat the dough all along the surface to lengthen and flatten. Roll out the dough lengthwise along the seam into a 24-inch-long, 1/4-inch-thick narrow slab, lightly dusting underneath and over top with more flour as needed to prevent sticking. Rather than applying pressure downward, try to push the dough toward and away from you with the pin, which will help maintain even layers of dough and butter. Remember to periodically lift the dough and make sure it’s not sticking to the surface, and try your best to maintain straight, parallel sides. (It’s OK if the shorter sides round a bit – you’re going to trim them.)
11. Use a wheel cutter or long, sharp knife to trim the shorter ends, removing excess dough where the butter doesn’t fully extend and squaring off the corners for a very straight-edged, even rectangle of dough. Maintaining the rectangular shape, especially at this stage, will lead to the most consistent and even lamination. If at any point in the process you see air bubbles in the dough while rolling, pierce them with a cake tester or the tip of a paring knife to deflate and proceed.
12. Dust any flour off the dough’s surface. Grasp the short side of the rectangle farther from you and fold it toward the midline of the dough slab, aligning the sides. Press gently so the dough adheres to itself. Repeat with the other side of the dough, leaving an ⅓cm gap where the ends meet in the middle. Now, fold the entire slab in half crosswise along the gap in the centre. You should now have a rectangular packet of dough, called a “book”, that’s four layers thick. This is a “double turn”, and it has now quadrupled the number of layers of butter inside the dough.
13. Wrap the book tightly in the reserved plastic. If it is thicker than about 3.8cm, or if it’s lost some of its rectangularity, roll over the plastic-wrapped dough to flatten it and reshape it. Freeze the book for 15 minutes, then refrigerate for 1 hour.
14. Let the dough sit at room temperature for about 5 minutes. Unwrap and place on a lightly floured surface. Beat the dough and roll out as before (step 10) into another long, narrow just under 1cm-thick slab. It should be nice and relaxed, and extend easily. Dust off any excess flour.
15. Fold the dough in thirds like a letter, bringing the top third of the slab down and over the centre third, then the bottom third up and over. This is a “simple turn”, tripling the layers. Press gently so the layers adhere. Wrap tightly in plastic again and freeze for 15 minutes, then refrigerate for 1 hour.
16. Let the dough sit at room temperature for about 5 minutes, then unwrap and place on a lightly floured surface. Beat the dough and roll out as before, but into a 35cm by 43cm slab (38cm-by-40cm for pain au chocolat or ham and cheese croissants). The dough will start to spring back, but try to get it as close to those dimensions as possible. Brush off any excess flour, wrap tightly in plastic, and slide onto a baking sheet or cutting board. Freeze for 20 minutes, then chill overnight (8 to 12 hours). If making pain au chocolat or ham and cheese croissants, see recipes.
17. Four and a half hours before serving, arrange racks in the upper and lower thirds of the oven. Bring an oven-safe pan of water to a simmer over medium-high heat. Transfer the pan to the floor of the oven and close the door. (The steam released inside the oven will create an ideal proofing environment.)
18. As the steam releases in the oven, line two rimmed baking trays with parchment paper and set aside. Let the dough sit at room temperature for about 5 minutes. Unwrap (save the plastic for proofing), place on a very lightly floured surface, and, if necessary, roll out to 43cm-by-35cm. Very thoroughly dust off any excess flour with a pastry brush. Use a wheel cutter or long knife and ruler to cut the shorter sides, trimming any irregular edges where not all the layers of dough fully extend and creating a rectangle that’s exactly 40cm long, then cut into four 10cm-by-35cm rectangles.
19. Separate the rectangles, then use the ruler and wheel cutter to slice a straight line from opposite corners of one rectangle to form two long, equal triangles. Repeat with the remaining rectangles to make 8 triangles. Trim the short side of each triangle at a slight angle, making them into triangles with longer sides of equal length.
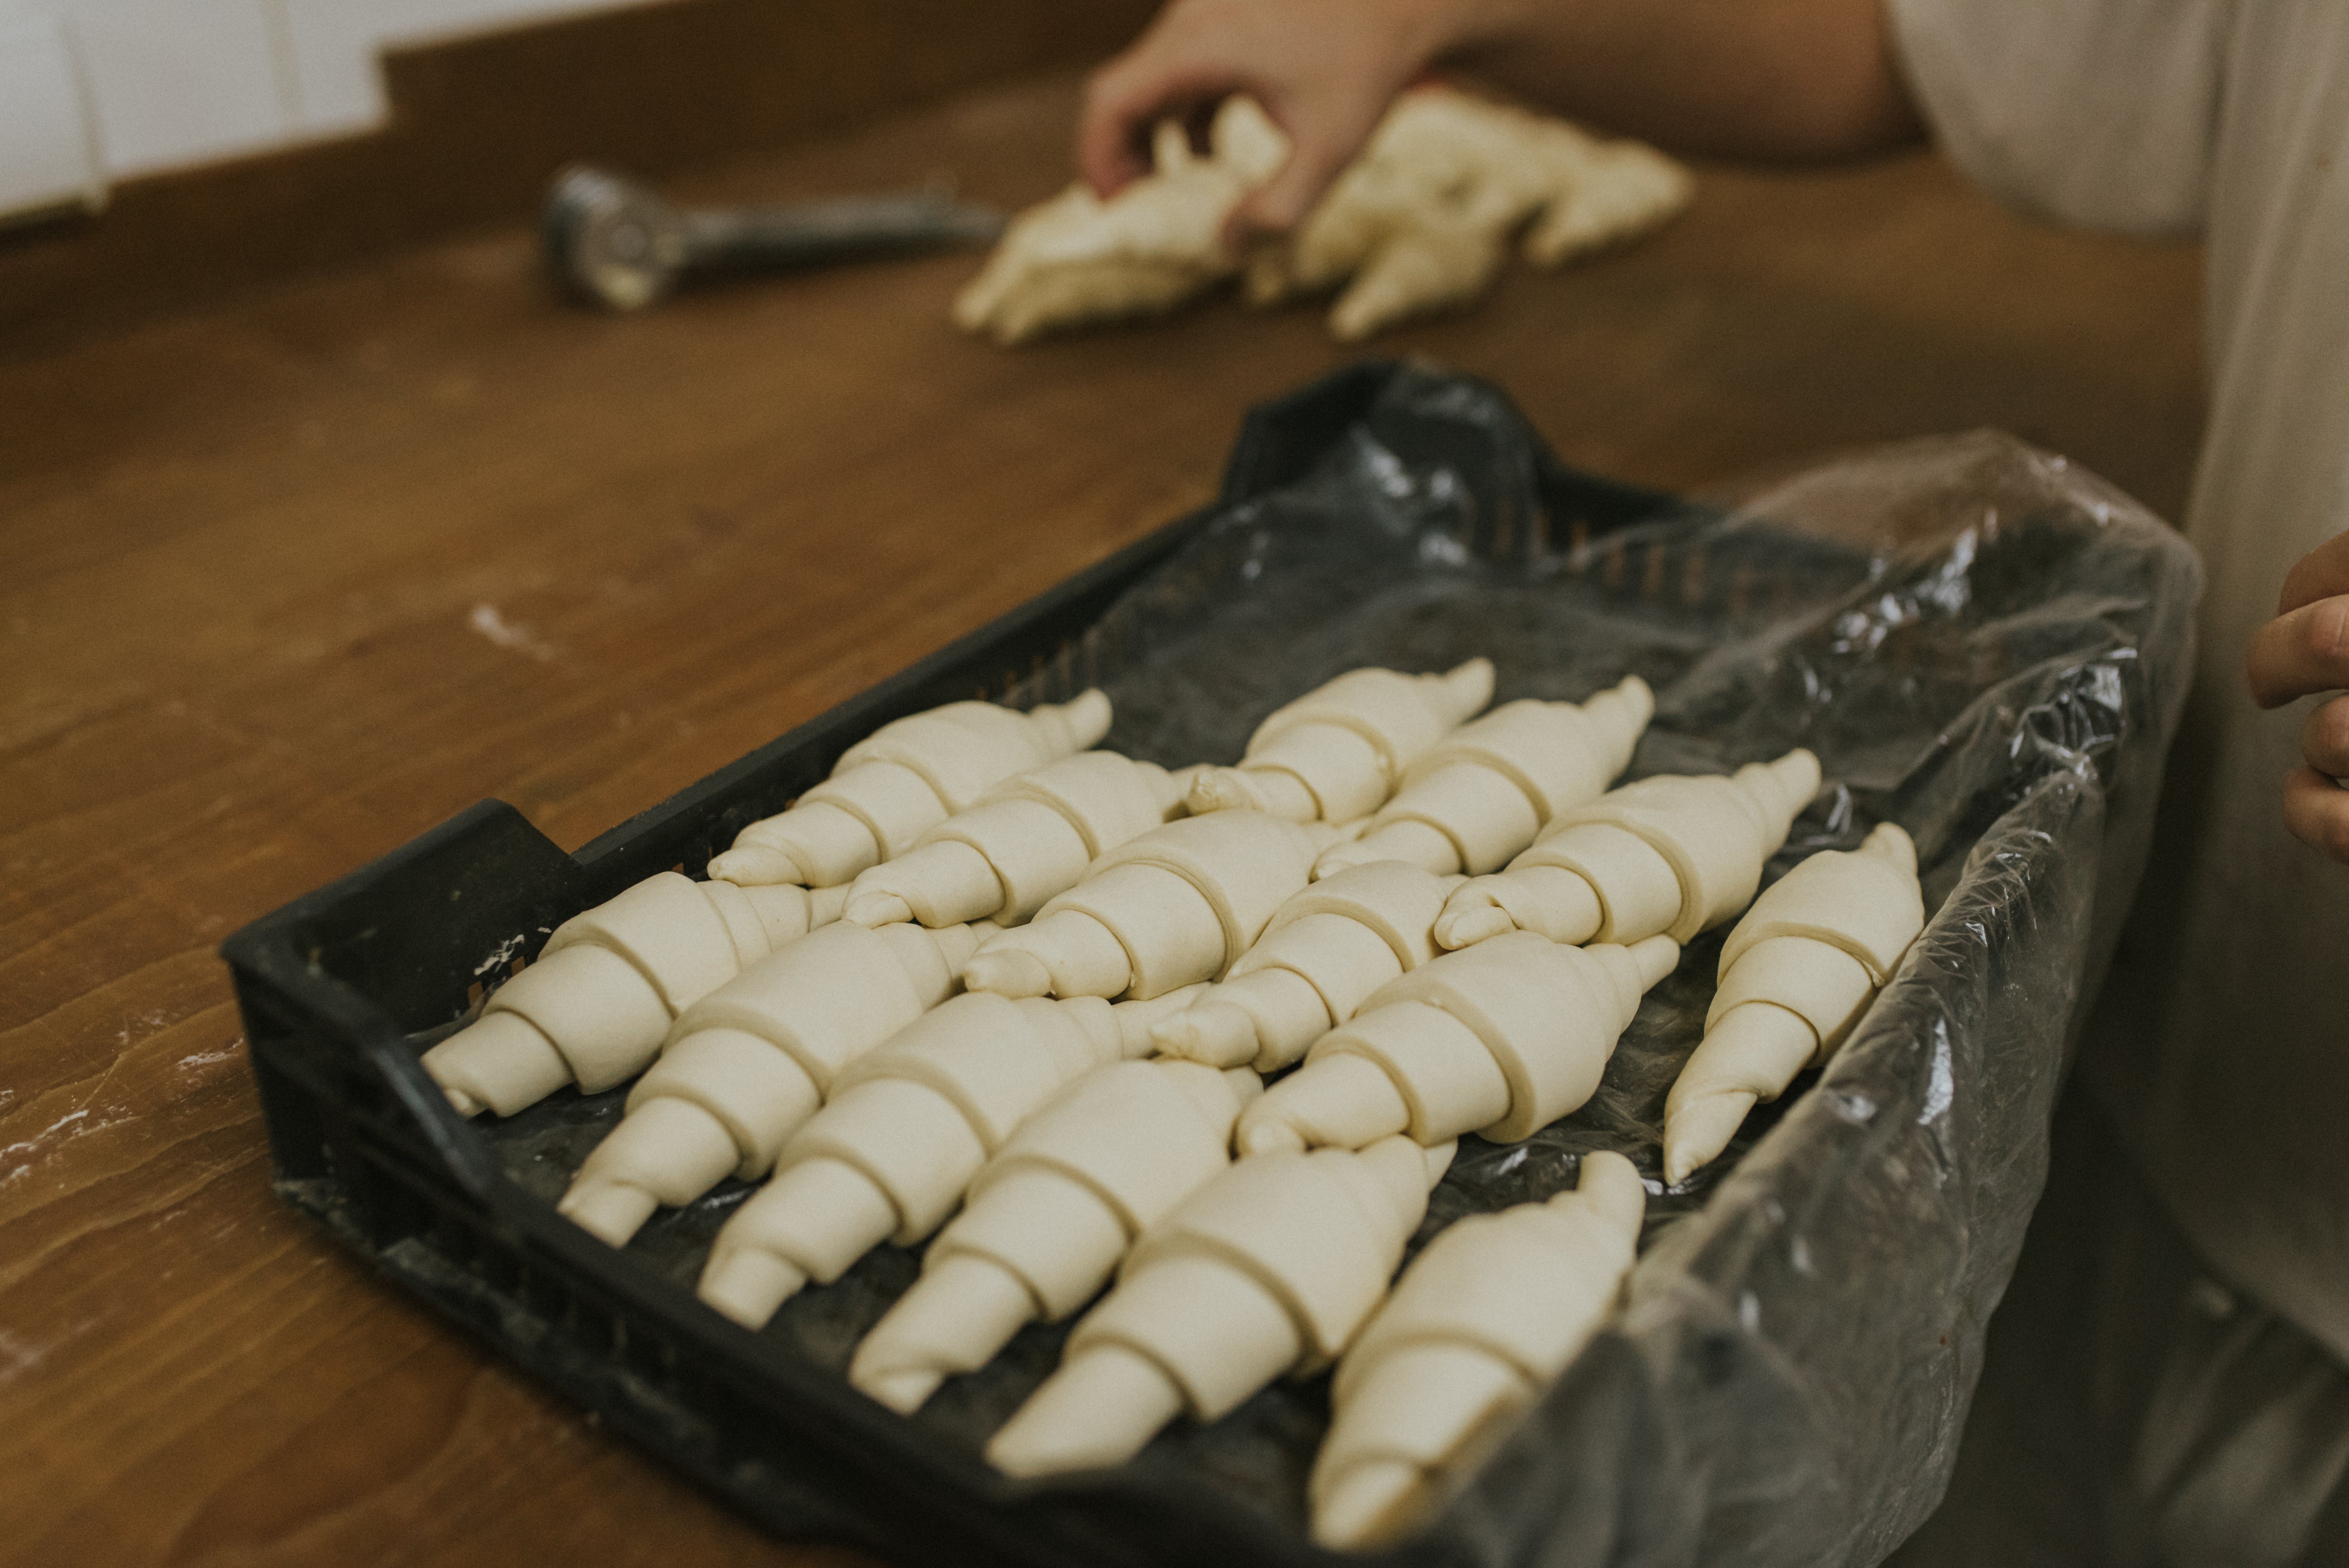
20. Working one triangle at a time, grasp the two corners of the shorter end, the base of the crescent, and tug gently outward to extend the points and widen the base to about 7.5cm. Then, gently tug outward from about halfway down the triangle all the way to the point, to both lengthen the triangle and thin the dough as it narrows. Starting at the base (the short end), snugly roll up the dough, keeping the point centred and applying light pressure. Try not to roll tightly or stretch the dough around itself. Place the crescent on one of the parchment-lined baking trays, resting it on the point of the triangle. If the dough gets too soft while you’re working, cover the triangles and freeze for a few minutes before resuming rolling. Space them evenly on the baking sheets, four per sheet. Very loosely cover the baking sheets with plastic wrap, so the croissants have some room to expand.
21. Three and a half hours before serving, open the oven and stick your hand inside: it should be humid but not hot, as the water in the pan will have cooled. You want the croissants to proof at 21C to 24C. (Any hotter and the butter will start to melt, leading to a denser croissant.) Place the baking trays inside the oven and let the croissants proof until they’re about doubled in size, extremely puffy, and jiggle delicately when the baking sheet is gently shaken, 2 to 2½ hours. Resist the urge to touch or poke the croissants as they proof: they’re very delicate. Try not to rush this process, either, as an underproofed croissant will not be as light and ethereal.
22. Remove the baking trays from the oven and carefully uncover them, then transfer to the refrigerator and chill for 20 minutes while you heat the oven. Remove the pan from the oven and heat to 190C.
23. In a small bowl, stir the yolk and heavy cream until streak-free. Using a pastry brush, gently brush the smooth surfaces of each crescent with the yolk and cream mixture, doing your best to avoid the cut sides with exposed layers of dough.
24. Transfer the sheets to the oven and bake for 20 minutes. Rotate the baking sheets and switch racks, and continue to bake until the croissants are deeply browned, another 10 to 15 minutes. Remove from the oven and let cool completely on the baking sheets.
Tips: Croissants are best within an hour or two of baking. After that, revive the croissants by warming in a 175C oven for 5 to 8 minutes. Keep wrapped airtight at room temperature.
Pain au chocolat

Chocolate sticks called “batons” are made especially for rolling easily into pain au chocolat. Here, two batons are spiraled into the dough so you get rich pockets of chocolate in each bite of flaky croissant. You can order batons online, but regular chocolate bars, cut crosswise into thin sticks, work just as well. Either way, use a good-quality chocolate.
Makes: 10 pains au chocolat
Total time: About 4 hours, largely unattended
Ingredients
Croissant dough, rolled out to a 38cm-by-40cm slab, chilled (see notes)
All-purpose flour, for rolling
20 chocolate croissant sticks, or 113g semi-sweet bar chocolate, cut crosswise into 20 even pieces
1 large egg yolk
1tbsp heavy cream
Method
1. Arrange racks in the upper third and lower thirds of the oven. Bring an oven-safe pan of water to a simmer over medium-high heat. Transfer the pan to the floor of the oven and close the door. (The steam released inside the oven will create an ideal proofing environment for the pains au chocolat.) Line two rimmed baking trays with parchment paper and set aside.
2. Remove the slab of dough from the refrigerator and let sit for 5 minutes at room temperature. Unwrap (save the plastic for proofing) and place on a very lightly floured surface. If the dough has shrunk during chilling, roll it out again to a slab that’s 40cm long and 38cm wide. Dust off any excess flour with a pastry brush.
3. Use a wheel cutter to trim 1.3cm of dough from all four sides, straightening and squaring them off, creating a slab that’s 38cm long by 35cm wide. Using a ruler, cut the slab lengthwise into 5 equal strips each measuring 7.5cm wide. Cut each strip in half crosswise, creating 10 rectangles.

4. Working one rectangle at a time, place a stick of chocolate along one of the shorter sides, leaving about a 2.5cm border. Fold the pastry over the chocolate until it’s wrapped around one time, then tuck another bar of chocolate into the fold. Wrap the pastry around the second bar of chocolate and continue to roll until you have a snug spiral. Transfer the pain au chocolat to a prepared baking tray, resting it on the seam. Repeat with the remaining dough and chocolate, dividing between the baking sheets and spacing evenly. Very loosely cover with plastic wrap so the pastries have some room to expand.
5. Open the oven and stick your hand inside – it should be humid but not hot, as the water in the pan will have cooled. You want the pains au chocolat to proof at 21C to 24C. (Any hotter and the butter will melt, leading to a denser pastry.) Gently place the baking trays inside the oven and let the pastries proof until they’re doubled in size, extremely puffy, and jiggle delicately on the baking sheet, 2 to 2½ hours.
6. Remove the baking trays from the oven and carefully uncover them. Transfer to the refrigerator and chill for 20 minutes while you heat the oven. Remove the skillet from the oven and heat to 190C.
7. In a small bowl, stir the yolk and heavy cream until streak-free. Remove the baking trays from the refrigerator and use a pastry brush to gently brush each pain au chocolat with the yolk mixture. Transfer the sheets to the oven and bake for 20 minutes. Rotate the baking sheets and switch racks, and continue to bake until the pains au chocolat are deeply browned, another 10 to 15 minutes. Remove from the oven and let cool completely on the baking sheets.
Tips: For the dough, follow the croissants recipe through step 16.
Pains au chocolat are best within an hour or two of baking. After that, revive them by warming in a 175C oven for 5 to 8 minutes. Keep wrapped airtight at room temperature.
Ham and cheese croissants

The amount of ham and cheese inside these croissants might seem a tad skimpy, but resist the urge to add more. The extra moisture from the filling can make the interior soggy and affect how the dough rises, so rest assured it’s more than enough to flavor these savoury pastries.
Makes: 10 croissants
Total time: 4 hours, largely unattended
Ingredients
Croissant dough, rolled out to a 38cm-by-40cm slab, chilled (see notes)
All-purpose flour, for dusting
10 very thin slices uncured ham, such as Paris ham (about 142g)
142g emmental, gruyère or Swiss cheese, grated
1 large egg yolk
1tbsp heavy cream
Method
1. Arrange racks in the upper third and lower thirds of the oven. Bring an oven-safe pan of water to a simmer over medium-high heat. Transfer the pan to the floor of the oven and close the door. (The steam released inside the oven will create an ideal proofing environment for the pastries.) Line two rimmed baking trays with parchment paper and set aside.
2. Let the dough sit for 5 minutes at room temperature. Unwrap (save the plastic wrap for proofing) and place on a very lightly floured surface. If the dough has shrunk during chilling, roll it out again to a slab that’s 40cm long and 38cm wide. Dust off any excess flour.
3. Use a wheel cutter to trim 1.3cm of dough from all four sides, straightening and squaring them off, creating a slab that’s 38cm long by 35cm wide. Using a ruler, cut the slab lengthwise into 5 equal strips each measuring 7.5cm wide. Cut each strip in half crosswise, creating 10 rectangles.
4. Working with one rectangle of dough at a time, cover one half with a slice of ham, folding it as needed to leave a 1.3cm border along the short side. Then, top with 2 tablespoons of the cheese. Roll the dough into a snug spiral, starting at the end with the ham and cheese, then transfer the spiral to one of the prepared baking trays, resting it on the seam. Repeat with the remaining dough, ham and cheese, dividing between the sheets and spacing evenly. Very loosely cover with plastic wrap so the pastries have some room to expand.
5. Open the oven and stick your hand inside: it should be humid but not hot, as the water in the pan will have cooled. You want the pastries to proof at 21C to 24C (any hotter and the butter will melt, leading to a denser pastry). Gently place the baking trays inside the oven on the two racks and let the pastries proof until they’re doubled in size, extremely puffy and jiggle delicately on the baking sheet, 2 to 2½ hours.
6. When the pastries are proofed, remove the baking trays from the oven and carefully uncover them. Transfer to the refrigerator and chill for 20 minutes while you heat the oven. Remove the skillet from the oven and heat to 190C.
7. In a small bowl, stir the yolks and heavy cream until streak-free. Remove the baking sheets from the refrigerator and use a pastry brush to gently brush the surfaces of each pastry with the yolk mixture. Transfer the sheets to the oven and bake for 20 minutes. Rotate the baking trays and switch racks and continue to bake until the pastries are deeply browned, another 10 to 15 minutes. Remove from the oven and let cool completely on the baking sheets.
Tips: For the dough, follow the croissants recipe through step 16.
The pastries are best within an hour or two of baking. After that, revive them by warming in a 175C oven for 5 to 8 minutes. Keep wrapped airtight at room temperature.
Almond croissants

Rum simple syrup and toasted almond cream – both quick and easy to assemble – are all you need to transform stale homemade or store-bought croissants into deliciously sweet and fragrant pastries. The amount of syrup might feel excessive, but it’s needed to replace the moisture lost in the croissants as they become stale, so be generous when soaking them.
Makes: 8 croissants
Total time: 1 hour
Ingredients
For the frangipane:
96g almond flour
113g unsalted butter, at room temperature
106g packed light brown sugar
2 large eggs, at room temperature
½tsp almond extract
3tbsp all-purpose flour
½tsp salt
For the syrup and assembly:
67g granulated sugar
2tbsp dark rum
8 stale croissants, halved horizontally
43g sliced almonds
Method
1. Make the frangipane: place the almond flour in a medium pan and set over medium heat. Cook, stirring frequently, until golden brown and toasty smelling, 5 to 8 minutes. Remove from heat and set aside to cool.
2. In a medium bowl, combine the butter and brown sugar, and beat with a silicone spatula or wooden spoon until the mixture is light and creamy, about 2 minutes. Switch to a whisk and whisk in the eggs, one at a time, until incorporated. Whisk in the almond extract, then add the flour, salt and toasted almond flour, and whisk until smooth and satiny. Set the mixture aside.
3. Make the syrup: in a small saucepan, combine the sugar, rum and 80ml water in a small saucepan and heat over medium, stirring just until the sugar dissolves. Remove from the heat and set aside.
Read more:
4. Assemble: arrange a rack in the upper third of the oven and heat to 175C. Line a large rimmed baking tray with parchment paper and set aside.
5. Use a pastry brush to soak the cut sides of the croissant halves liberally with the rum syrup. (Use most of it or all, if the croissants are very stale.) Spread the bottom halves with half of the frangipane, dividing evenly and spreading all the way to the edges. Place the top halves over the bottom halves, then spread the remaining frangipane over the tops of the croissants. Sprinkle the sliced almonds over top, dividing evenly.
6. Place the croissants on the baking sheet, spacing evenly, and bake until the almonds are toasted and the frangipane is golden brown, 20 to 25 minutes. Serve warm or at room temperature.
Tips: The pastries are best within an hour or two of baking. After that, revive them by warming in a 175-degree oven for 5 to 8 minutes. Keep wrapped airtight at room temperature.
© The New York Times
Join our commenting forum
Join thought-provoking conversations, follow other Independent readers and see their replies
Comments
Bookmark popover
Removed from bookmarks