How to build a treehouse
Let's be blunt. Building a decent treehouse is really hard. It takes something like 60 man hours start to finish and costs more than £100 in wood and materials. In other words, it's a job for dads. We are well aware of the satisfaction gained from nailing bits of wood to a tree, but for something that looks right, is strong and safe and will last more than just a few months, you need a bit more than that.
Along with a canoe or a small sailing dinghy, a treehouse is still one of the best things you could possibly have. It's worth the effort, the sweat, the cost, even the blood, if whoever builds it is careless with power tools. It is a thing of beauty. It really should have a skull and crossbones on it somewhere, as well.
You will need
30 6in (15cm) coach screws with heavy square washers
Eight 8in (20cm) coach screws with washers
32 4in (10cm) coach screws with washers
4 × 3in beams – at least 16ft, but better to get 20ft (6m)
2 × 6in (5 × 15cm) pine planking – 64ft (19.5m).
2 × 4 timber for roof joists and walls – 2ft + 152ft (10m + 46m): 184ft (56m)
Pine decking to cover the area of the platform – 49sq ft (4.5sq m)
Pine decking for the ladder – 27sq ft (2.5sq m)
Jigsaw power tool, electric drill, rip saw.
(Preferably an electric table saw.)
Spirit level
Large drill bits of 14, 16 and 18mm
Stepladder and a long ladder
Safety rope
Bag of clout nails and a hammer
"Shiplap" planking – enough to cover four half walls with a total area of 84sq ft (7.8sq m). Add in approximately 49sq ft (4.5sq m) for the roof
Ratchet spanner with a set of heads to tighten the coach screws
Chisel to cut trenches for the trap door hinges
Two hinges
Four eyebolts that can be screwed into the trunk
Cloth bag for trap-door counterweight
To build the platform, you need some 2 x 6in (5 x 15cm) pine planking, available from any large wood supplier. Our base was 7ft by 7ft (2.1m x 2.1m) and that worked out as eight 7ft (2.1 m) lengths, with one more for bracers.
Altogether: 64ft (19.5m) of 2 x 6. You really don't want something this heavy to fall down with children in it. Wherever possible, we went for huge overkill with materials, working on the principle that "in the event of nuclear war, this treehouse would remain standing".
Choose the height of the base from the ground. This will depend in part on the age of the children, but we put ours eight feet up. Higher ones are more impressive, of course, but are harder to make.
If the ground is soft, use a board to stop the feet of the ladders from sinking in.
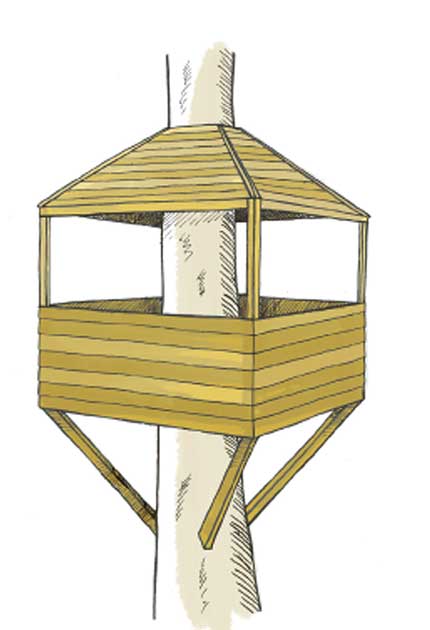
The platform
The coach screws need to have holes pre-drilled, so make sure you have a suitable drill bit and a long enough extension lead to reach the tree. We ended up using three leads attached to each other and a double socket on the end. For a previous job, we had attached a table saw to an old table and it proved extremely useful to be able to cut wood as required.
Build the platform as shown in the diagram above. Use the safety rope to support the planks until they are secure, putting the rope over a higher branch and tying it off when they are in position. Do not try and walk on the platform before it is supported at each corner. For it to drop, it would have to sheer off a number of steel coach screws, but the turning force of someone standing on a corner is huge and could be disastrous.
Supporting the platform
Beams measuring 4 x 3in (10 x 7.5cm) are immensely strong – probably far too strong for the job. Given that the trunk is likely to be uneven, they will almost certainly have to be different lengths.
First cut them roughly to size, being generous. The hard part is cutting the join where the top of the beam meets the platform.
The strength comes from the fact that the platform sits on a flat surface at all four corners. The joint for this looks a little like a bird's open mouth. Cut it by hand, marking it out carefully. The first task is cutting a ninety-degree triangle with two saw lines.
Mark a point 4in (10cm) from the end on both sides, then draw a line to it from the opposite edge. Repeat to give you two diagonal lines. Where they meet is a neat centre point. Measure it all twice. Cut from the edge inwards.
The second and spatially trickier cut is straight down on one of the cut edges. Again, measure carefully and cut. It might be worth practising on a bit of scrap wood first. You should end up with four ends that fit neatly inside the corner of the main platform and support it as well.
Eight-inch (20 cm) coach screws might seem excessive to attach the four diagonals to the trunk, but everything rests on them. Drill through the four inch length of the diagonal beam, so another four inches of steel goes into the tree.
Don't worry, you won't kill it. Trees are very resilient and a good park keeper's pruning does more damage than this.
When the four diagonals are in place, the platform cannot tip without actually crushing one of them. This is practically impossible. We tested the strength by putting six adults up in the finished treehouse, with a combined total of more than 60st (380 kg).
We used offcuts of 2 x 6 to add bracers to any spare gap in the platform. Rather than being another example of our usual overkill, this was used to support the decking. Make sure you leave a gap for the trap door. We used standard pine decking available from any DIY store. It has the advantage of being treated against damp.
Getting them treated is a little more expensive but makes the difference between a treehouse lasting 10 years and 20.
We screwed the decking straight into the bracers and main beams of the platform, using a jigsaw to shape it around the actual trunk. Leave a little gap to allow for tree movement and somewhere to sweep dust and dead leaves.
The walls
It is easiest to assemble these rectangles on the ground, then hoist them into place. That said, they are extremely heavy, so use ropes and two people at least. Do not attempt to lift the section without it being held by a strong rope.
For each wall, 4 x 2in (10 x 5cm) beams were used, with four-inch coach screws holding them together.
We planned to cover the lower half of each wall with overlapping shed planking, except for one left open with just wire to stop the children falling through.
It was absolutely crucial to have a drill powerful enough to send screws straight into the wood without pre-drilling. If we'd had to drill every hole first, we'd probably still be there now.
The shape was a simple rectangle with a ledge and a couple of support uprights. When you are deciding how tall it should be, remember that it is a treehouse for children. We went with five foot six inches, which was probably generous.
Each wall just sat on top of the decking and was screwed into it from above. Please note that it will feel wobbly at this stage. The four walls all support each other and when the last one is put in place, it becomes extremely solid. The roof will also add stability.
Also note that two of the walls will be shorter than the other two, so plan and measure these carefully or you'll have an awful time.
You may also have trouble with the heads of the coach screws getting in the way.
Although it's time-consuming, you may have to countersink these with ¾ inch (16/18 mm)wood drill bit.
As well as the four-inch coach screws, we used four six-inch bolts and nuts to bring the sides together.
The roof
Once the four walls are in place and solid, you can think about the roof. We used eight joists of 2 x 4ft. The length will depend on the angles involved, but allow at least four feet for each one.
Cut them roughly to size, then take out a triangle near the end so that they will fit neatly over the top corner of the walls. In theory, this is the exact opposite of the lower diagonals, but we didn't think it was worth cutting more "bird-mouth" joints.
Measure and cut very carefully here as one end will be in contact with an uneven trunk. Use six-inch coach screws (8) to anchor them to the tree. The roof supports only its own weight.
After placing the four diagonal joists for the corners, add four more joists between them, one to each side. Use a spirit level to be certain they are all at the same height, or your roof will be uneven. There are various ways of finishing a roof, of course. We used a plastic roof membrane tacked to the eight joists with clout nails. Over that, we nailed strips of overlapping shed planking, known as "shiplap". It looked very natural, but each piece had to be cut to size and then taken up the tree. We also nailed very thin battens on the diagonals for cosmetic effect.
The roof was probably the most time-consuming part of the whole process – and a good safety rope at that height was absolutely crucial. In fact, to reach the highest point of the roof, we had to stand on the window ledges, make a loop out of the rope and sit on the loop as we leaned out. To say the very least, this is extremely dangerous and for dads only.
Finally, we used the same overlapping planking to cover the lower half of the walls, then made a ladder out of decking planking. We attached the top of the ladder with loose bolts on the basis that it could be pulled up at some point in the future. It probably never will be though – it is far too heavy.
We made the trap door from offcuts of decking and some pine planking, screwing it all together. To pull the trap door closed behind you, a piece of rope hanging from an eyebolt is perfect.
To prevent the trap door dropping on small fingers, it's worthwhile counterweighting it. To do this, get yourself a cloth bag of the sort you sometimes get shoes in. Run a rope through the trap door, with the knot on the underside. The other end should go through an eyebolt higher up the trunk and a third one out on the wall. Tie the bag of stones to the end and leave it dangling where the children can reach it. To open the trap door from below, they can pull on the bag. To close it, they pull on the knotted rope hanging down from the trap door. You'll have to adjust the weight of the bag to suit the child, of course, and it means the trap door has to be pressed shut with a foot when you're up there, but it's much safer.
The important thing when it's all done is to wait for a nice summer evening, take some cushions, blankets and a torch and spend the night up there under the stars. Take snacks – all that fresh air will give you an appetite.
This is an edited extract from 'The Pocket Dangerous Book for Boys: Things To Do', by Conn Iggulden and Hal Iggulden (£8.99), published in hardback by HarperCollins. To order a copy for £8.50 with free P&P call Independent Books Direct on 08430 600 030, or visit www.independentbooksdirect.co.uk
Make it legal
New rules came into force on 1 October 2008 which state that "No verandas, balconies or raised platforms" can be built without planning permission. "Raised" is defined as anything over 30cm.
Applying for planning permission entails filling in an application form, which you can download from www.planningportal.gov.uk. An application fee will be applicable, usually around £150. Supporting documents will be required. Download the Planning Advice Note, which contains a checklist of all the documents you will need. Ceiri O'Driscoll
Join our commenting forum
Join thought-provoking conversations, follow other Independent readers and see their replies
Comments
Bookmark popover
Removed from bookmarks