The Ultimate Wood Fired Oven Cookbook: From Cambodian mussels to garlic butter dough balls
There’s a great deal more versatility than you might think with wood burning stoves – they’re as well suited for big shareable dishes as they are for baking bread or even just making a comforting snack
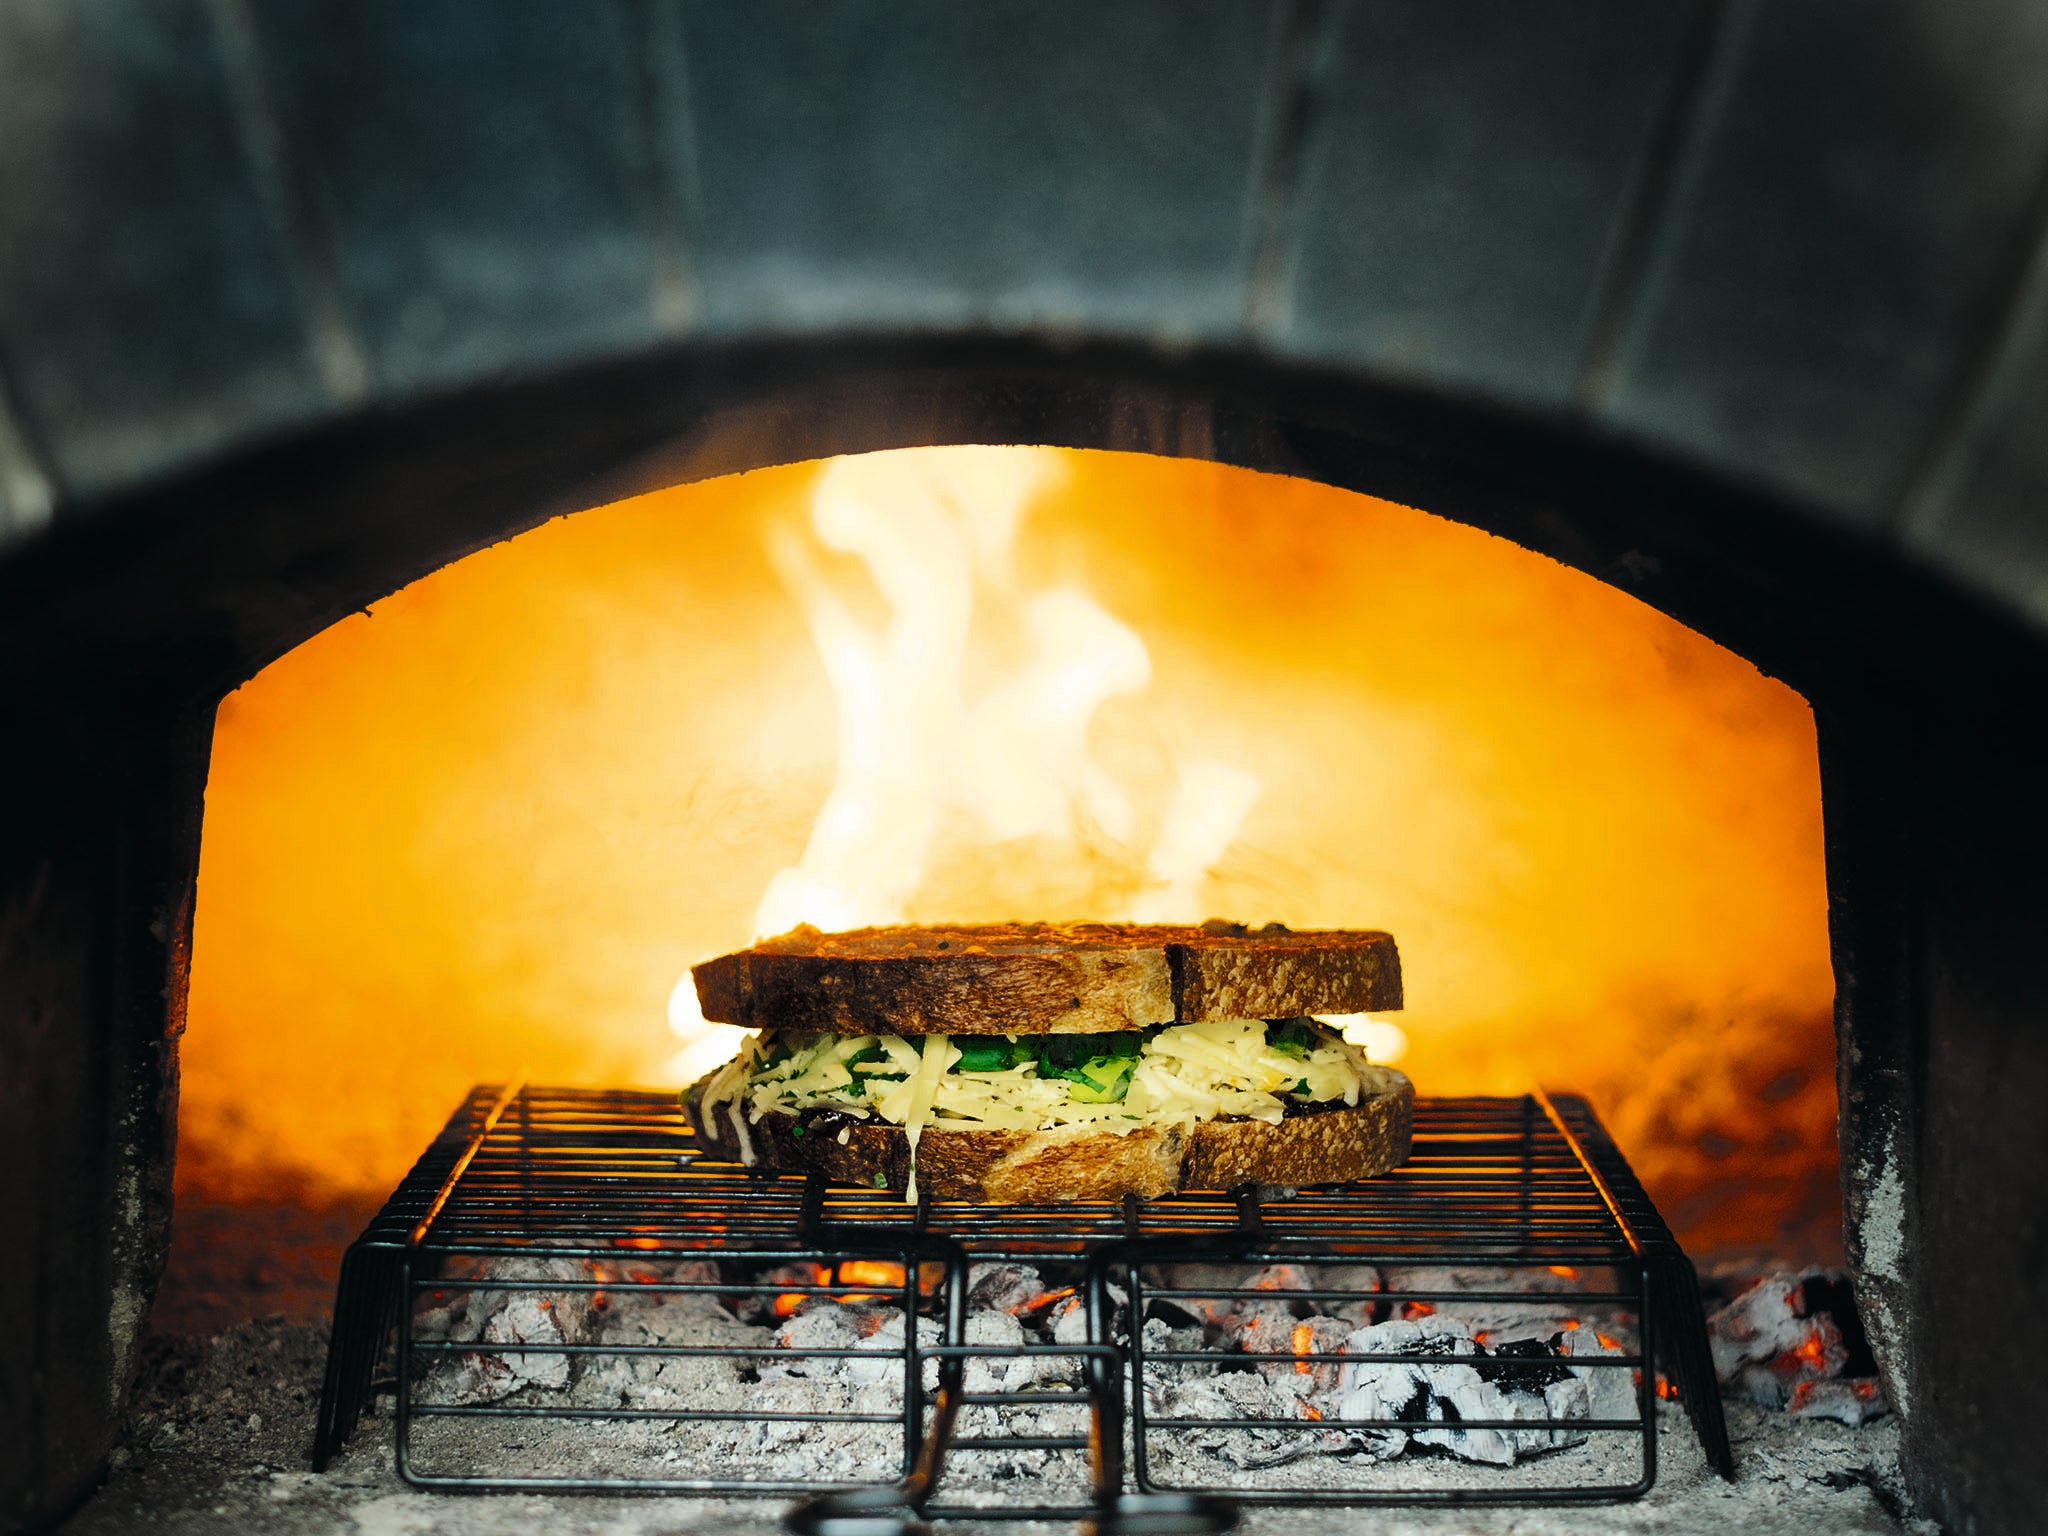
Spicy cheese toasties, wood oven-style
An insanely good little chef’s perk to knock up while you are getting the oven hot for a cooking session or when you have a gap between cooking other dishes, making cheese toasties in your wood oven couldn’t be easier. In this version I’ve spiced it up, as is often my way, with some punchy aubergine pickle, but you can take this idea any way you like. The trick to perfection is buttering the outside of the bread so that it crisps up beautifully.
Serves 1
A couple of slices of your favourite bread, cut to about 1cm thick
Soft butter, to spread over the bread
About 75g (¾ cup) mature cheddar, grated
1 spring onion (scallion), finely chopped
A little chopped fresh coriander
1-2 tsp brinjal (aubergine) pickle
Freshly ground black pepper
Temperature here is not that important but a few embers pulled from the fire will speed up toasting considerably. Butter the slices of bread and lay them butter side down on a plate.
Sprinkle the cheese over one slice of bread and scatter the spring onion and coriander on top. A good grind of pepper wouldn’t go amiss either. Spread the brinjal pickle on the other slice, then turn it butter side upwards as you press it onto the cheese topping.
When you are ready to grill your sandwich, use a metal peel to pull a few embers into the centre of the oven. Rest a grill over the embers to heat up for 5-10 minutes. Place the slices on the hot grill rack and slide it into the oven near the fire, toasting for a few minutes until the bread is crisp and the cheese is melting. Turn it over halfway through and rotate it to make sure it’s cooking evenly.
And another thing...
Instead of spiced pickle and coriander:
• Try a few slices of ripe tomato tucked in between the grated cheese.
• Use a dollop of pesto instead of the pickle, or use traditional autumn apple and tomato chutney instead of the Indian flavours.
• Or try a smear of mustard: English, Dijon or wholegrain.
• Brie, gruyère, smoked cheddar, some sort of blue cheese are all good cheese swaps.
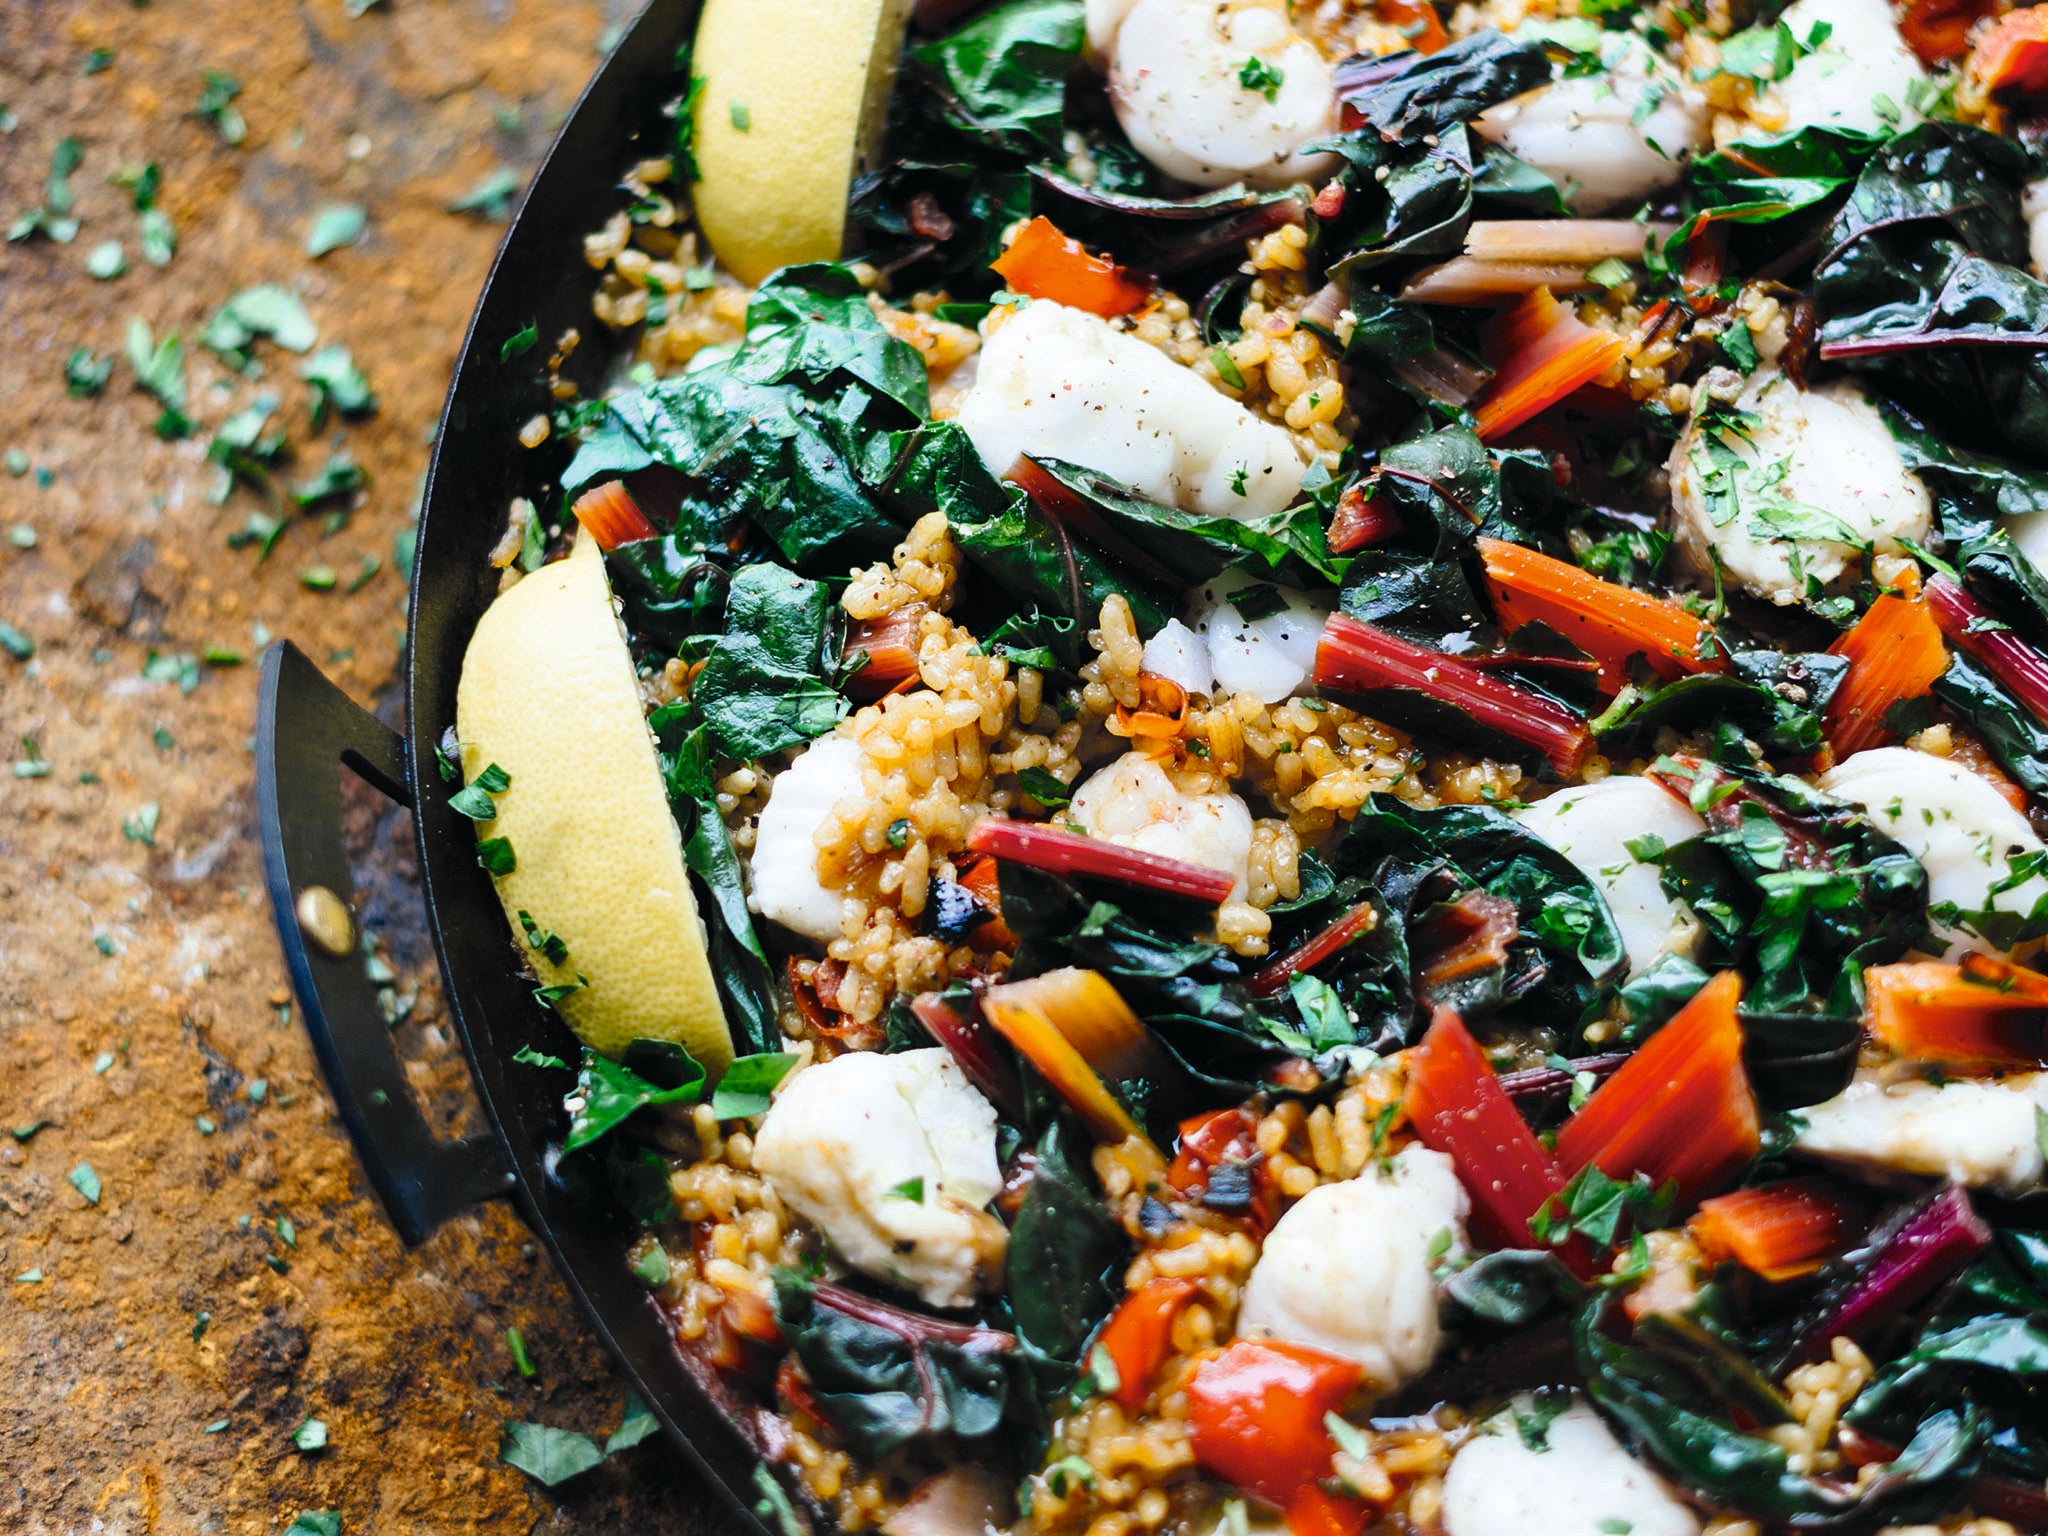
Wood baked paella with monkfish and chard
Authentic paella is always cooked outside over a wood fire, making it the perfect candidate for your wood fired oven. The most prized part of this dish is the caramelised, stuck-on bits of rice at the base, and you want to do all you can to encourage this to happen.
Serves 6
A pinch of saffron strands
3 tbsp olive oil
2 onions, chopped
2 red peppers, chopped
3 large vine tomatoes, finely chopped
3 cloves of garlic, finely chopped
1-2 tsp smoked paprika
200ml medium to dry sherry (I like to use a rich Oloroso)
400g paella rice
1 litre fish stock
500g rainbow chard
500g monkfish fillet, cut into 3-4cm chunks
Salt and freshly ground black pepper
To serve
Small bunch of fresh flat-leaf parsley
1 lemon, cut into wedges
You want the oven to be running at around 230-250C for this paella, with some lively dancing flames and plenty of glowing embers. Have the fire running to one side of the oven, and once you add the rice to the pan, use a metal peel to scoop the fire over to the other side. Then slide the pan back into the hot spot where the fire was. This will help your paella develop the authentic, but sometimes elusive, sticky golden crust on the base. If you think the oven isn’t hot enough, drag a bed of embers into the centre of the oven and rest your pan directly on them for the final 10-15 minutes of cooking.
Put the saffron into a small heatproof glass and pour over a tablespoon or two of boiling water. Set aside to infuse. Pour the oil into a large (30-35cm) heavy-based frying pan (if you have a paella pan, all the better) and slide it into the hot oven for a minute to heat up. Add the onions and peppers and slide it back in, leaving them to soften and colour for a good 20 minutes, stirring a couple of times.
Add the tomatoes, garlic, smoked paprika and a good seasoning of salt and pepper, and slide the pan back into the oven to cook for another 10 minutes. Pour in the sherry and saffron water, stir well to mix, and put back for another 10 minutes to allow the sherry to reduce down. Remove the pan, stir in the rice and pour in the stock, giving it a good stir to mix evenly. Cover the pan loosely with foil. Rearrange your fire as described above, and slide the pan back into the hot spot where the fire was. Leave to cook for 20 minutes.
Meanwhile, bring a large pan of lightly salted water up the boil on the hob. Slice off the chard stalks and chop them into 4-5cm pieces. Slice the leaves across into 1cm ribbons. Plunge the chard stalks into the boiling water and blanch for 3 minutes, then add the leaves and cook for another minute. Drain well and run the chard under cold water to stop it cooking.
Squeeze out any excess water and have it ready to take to the fire. After the rice has had 20 minutes, take the pan out of the oven and assess the heat. At this point, if you think the rice is not getting enough bottom heat, pull the embers into the centre with the metal peel. Add the monkfish to the rice, distributing it evenly and pressing it deep into the paella, but don’t stir it through or you’ll disturb the caramelising layer on the base. Scatter the blanched chard over the rice.
Cover the pan loosely again with foil and return it to the oven, resting it directly on the embers to give it an extra boost of heat. Cook for a further 10-15 minutes, or until the fish is opaque and just cooked through. Scatter the paella generously with parsley and tuck a few lemon wedges around to squeeze over as you eat.
And another thing...
• Replace the chard with samphire, spinach or peas if you prefer.
• Use another meaty fish in place of monkfish – chunks of salmon or even haddock wouldn’t be traditional but would definitely taste good.
• Swap the sherry for dry white wine.
• Add a little diced spicy chorizo along with the peppers and onions.
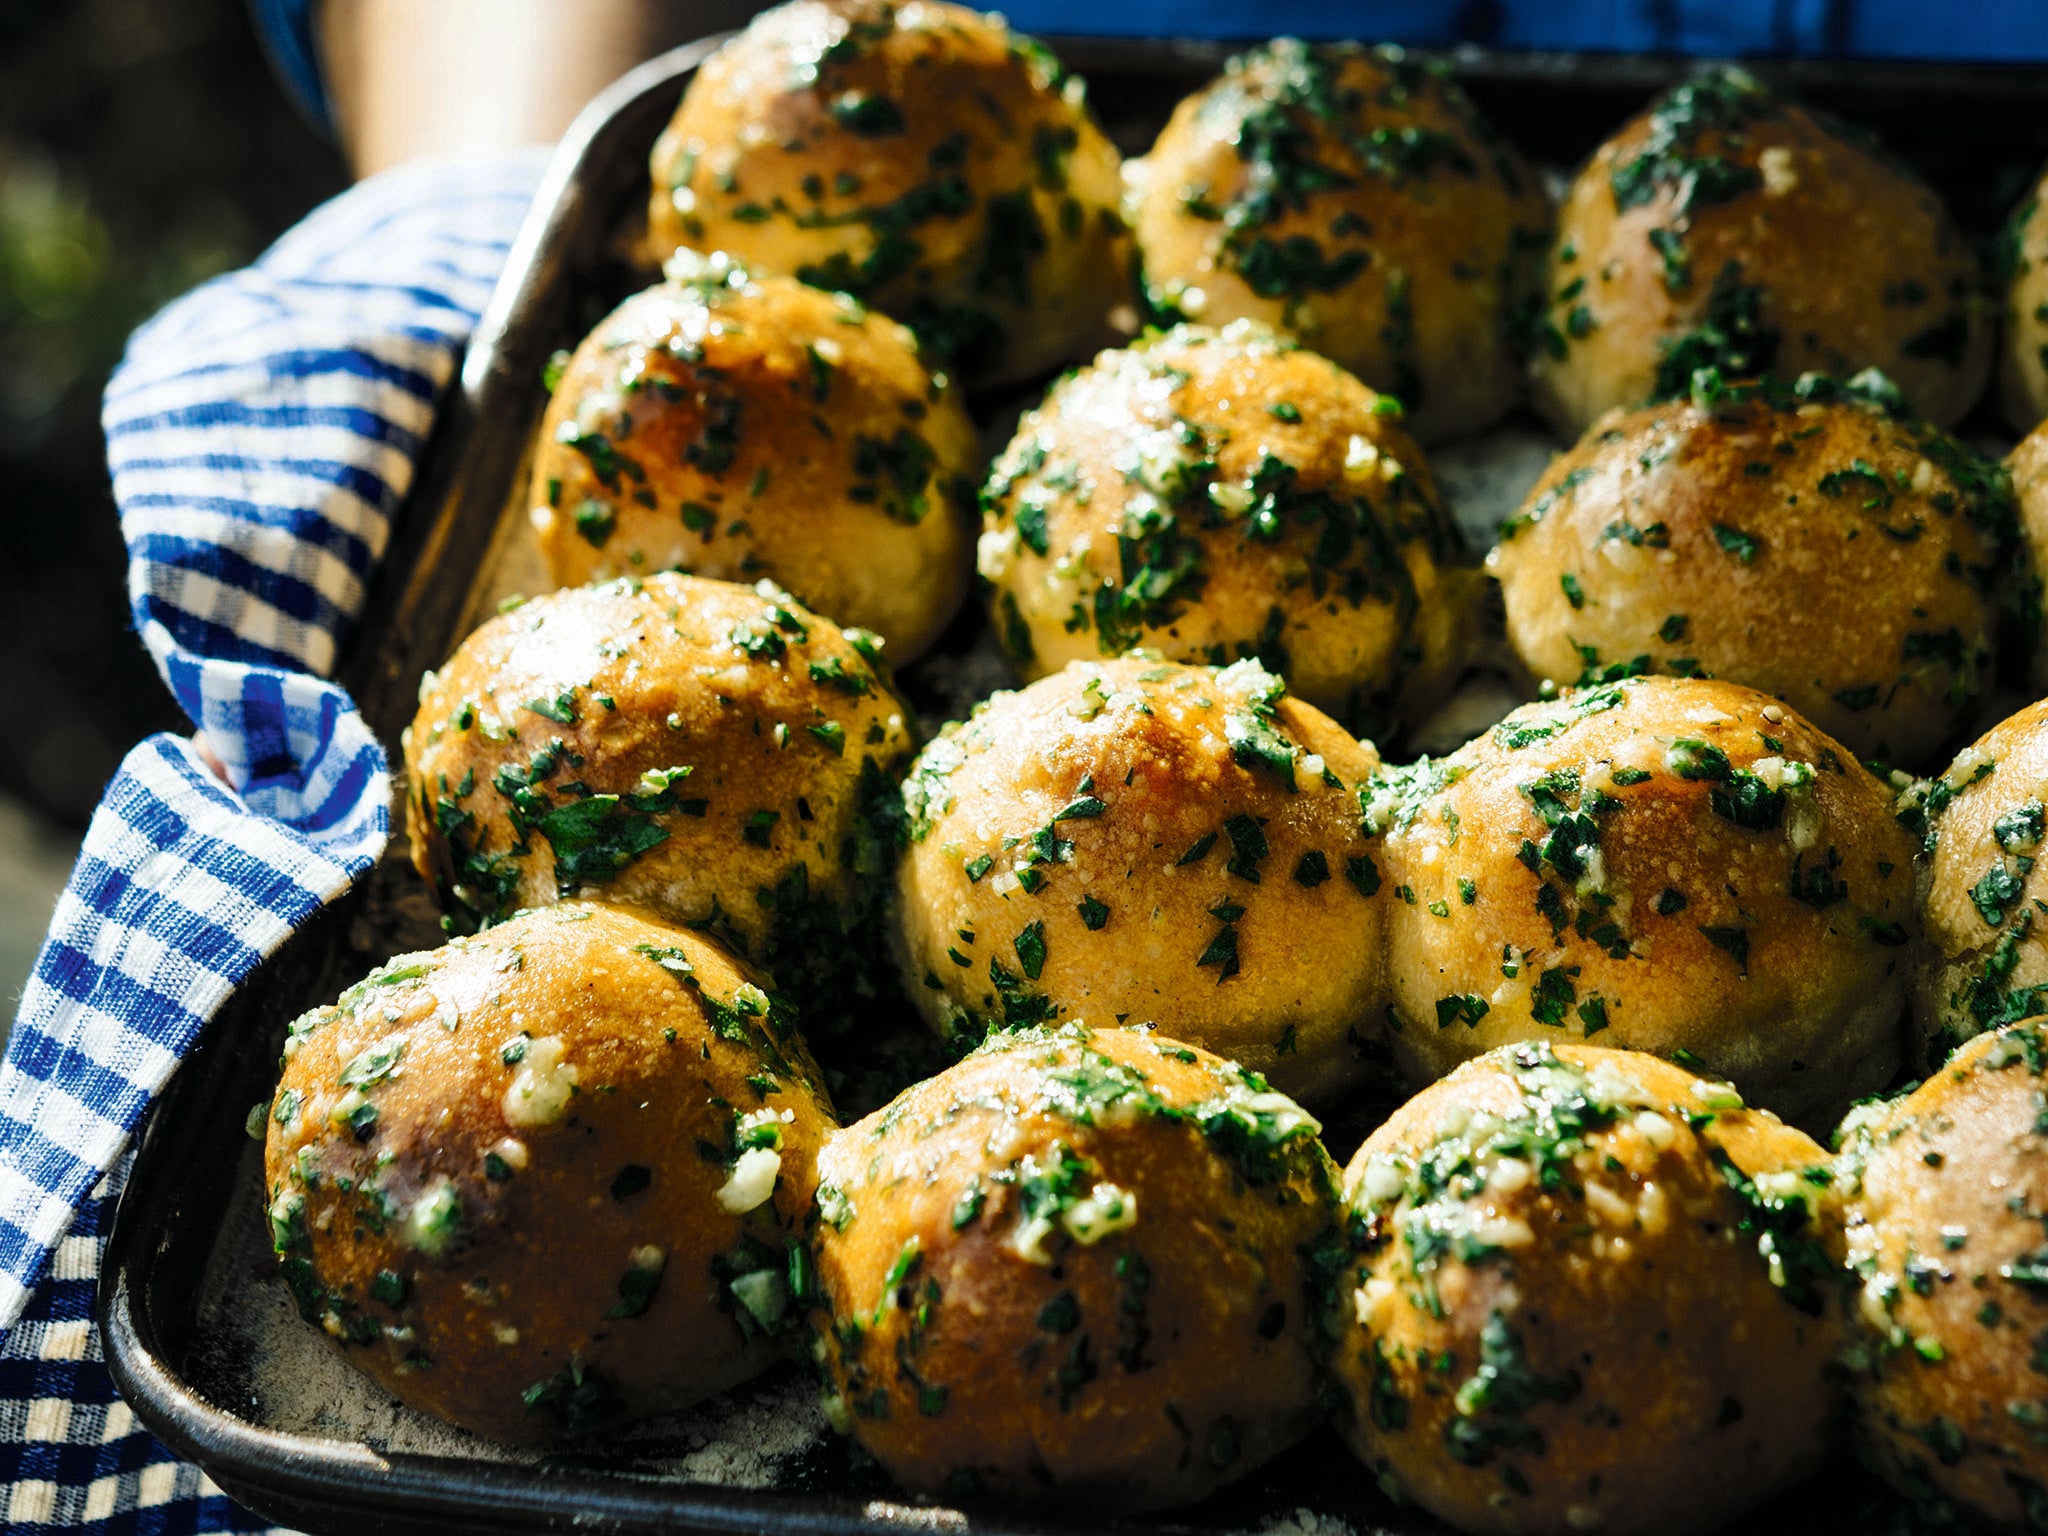
Garlic butter dough balls
Who doesn’t love a warm ball of dough, crisp on the outside and squishy in the middle, smothered in garlic butter? In our house a tray of these disappears in mere seconds. The trick, I think, rather than using the garlic butter as a dip to dunk the bread into, is to make it soft enough so you can take a brush and douse the hot dough balls as soon as they come out of the oven. Leave to soak in for a couple of minutes, providing you can fend off hungry mitts, and you will be in garlic bread heaven.
Makes 16 balls
½ x the easy everyday dough (see below)*
For the garlic butter
50g butter, softened
1-2 cloves of garlic, crushed, to taste
1 tbsp finely chopped fresh flat-leaf parsley
Salt and freshly ground black pepper
Have your oven at around 250C. Take the dough and pat it into an oblong on a lightly floured worktop. Cut in half, then pat each into an oblong again and cut each in half. Repeat twice more so you have 16 pieces of dough in total. Shaping the dough into oblongs before you cut just helps you gauge more easily what half looks like, leaving you with evenly sized pieces. Just as with the large loaf, cup each ball of dough between floured palms and rotate it, pulling the top down and tucking under to give you a compact ball with a smooth top. Repeat with all the dough balls, lining them up, well spaced out on a floured baking sheet, as you go.
Leave a couple of centimetres between the balls to allow for expansion. Set aside to prove for a further hour. While the dough balls are having their second rise, make the garlic butter. Mix the softened butter with the garlic and parsley and season well with salt and pepper.
Leave by the door of the oven so that it softens to a brushing consistency, not quite melted but very soft. Once the dough balls have had their second prove, slide them into the oven and shut the door. Bake for about 20 minutes, rotating the baking sheet halfway through cooking to ensure they bake evenly. Brush with garlic butter as soon as they come out the oven and leave to cool for a few minutes before tucking in.
*Easy everyday dough
This easy dough needs very minimal kneading and is started off with a “sponge”, a very wet dough mixture that has a long, slow rise to give the yeast a chance to gently work its magic. It is the easy bread recipe I turn to time and time again, and once the dough has finished proving you can process it into various useful things.
800g white bread flour, or a 50:50 mix of white and wholemeal bread flours
2 tsp fast-action yeast
550ml hand-hot water
2 tsp fine salt
2 tbsp olive oil, plus more for kneading
Put half the flour into a large mixing bowl and sprinkle in the yeast. Stir well to mix, then pour in the warm water, stirring until you have a spongy wet dough. Cover and set aside on the worktop for at least 3 hours, or ideally overnight in the fridge. Once you are ready to carry on with the bread, add the other half of the flour to the sponge along with the salt and olive oil. Use your hands to mix and bring it together as a lumpy dough with no loose flour. The dough will be really sticky, as will your hands – just scrape the dough off as best you can back into the bowl and all the bits will get incorporated back into the dough as you gently knead it.
Cover and set aside for 10 minutes. Lightly oil the worktop and scrape the dough on to it, cleaning the bowl out as much as you can. Add a little oil to the bowl and rub it all over with your hands. With lightly oiled hands, knead the dough briefly, just for 10 seconds or so, gently pushing and pulling it back and forth using the heel of your palm. It will still be very sticky, and quite lumpy and uneven. Scoop the dough back up and into the oiled bowl. Cover and set aside for 10 minutes. Repeat this gentle kneading followed by a 10-minute rest twice more. Each time you do it you will notice the dough becoming smoother and less sticky.
After the final light knead, put the dough back into the bowl, cover, and leave to prove for a generous hour or two until the dough has doubled in size. You are now ready to shape your dough. I usually split my bowl of dough in half, and make one loaf as below, and either dough balls or the ever useful and very portable bread “roll-ups”.
A floury loaf
This is a lovely, regular loaf of bread with no frills or fanfare, but one that is endlessly useful. It keeps well for a few days in a loosely sealed bag. I use a squareish metal basket for mine, which means it comes out with fairly square, even sides, but it will happily hold its shape on a flat tray too. You could also make it more of an oval shape and bake it in a regular loaf tin.
Once the dough has finished proving, scrape it on to a lightly floured worktop. Use a sharp knife or a dough cutter to chop it in half. Reserve one half for the dough balls or make a second loaf.
Take the dough and cup it between your lightly floured hands, rotating it round on the worktop and drawing the sides down and tucking underneath to make a compact, smooth ball. Dust all over with flour, then place it tucked side downwards on a floured baking sheet or shallow tin. Set aside to prove for a further hour.
Once the dough has risen for the second time, take a really sharp knife and slash across the top a few times. This not only looks pretty but it allows the bread to rise in a controlled way. If you don’t cut it, it will have a tendency to burst somewhere else.
Slide the loaf into the hot oven, about 250C, then shut the door and leave to bake for 30-35 minutes, until deep golden brown. Resist the urge to open the door for a peek until at least halfway through baking, at which point rotate the tray or tin to ensure it cooks evenly.
Allow to cool on a baking rack before slicing.
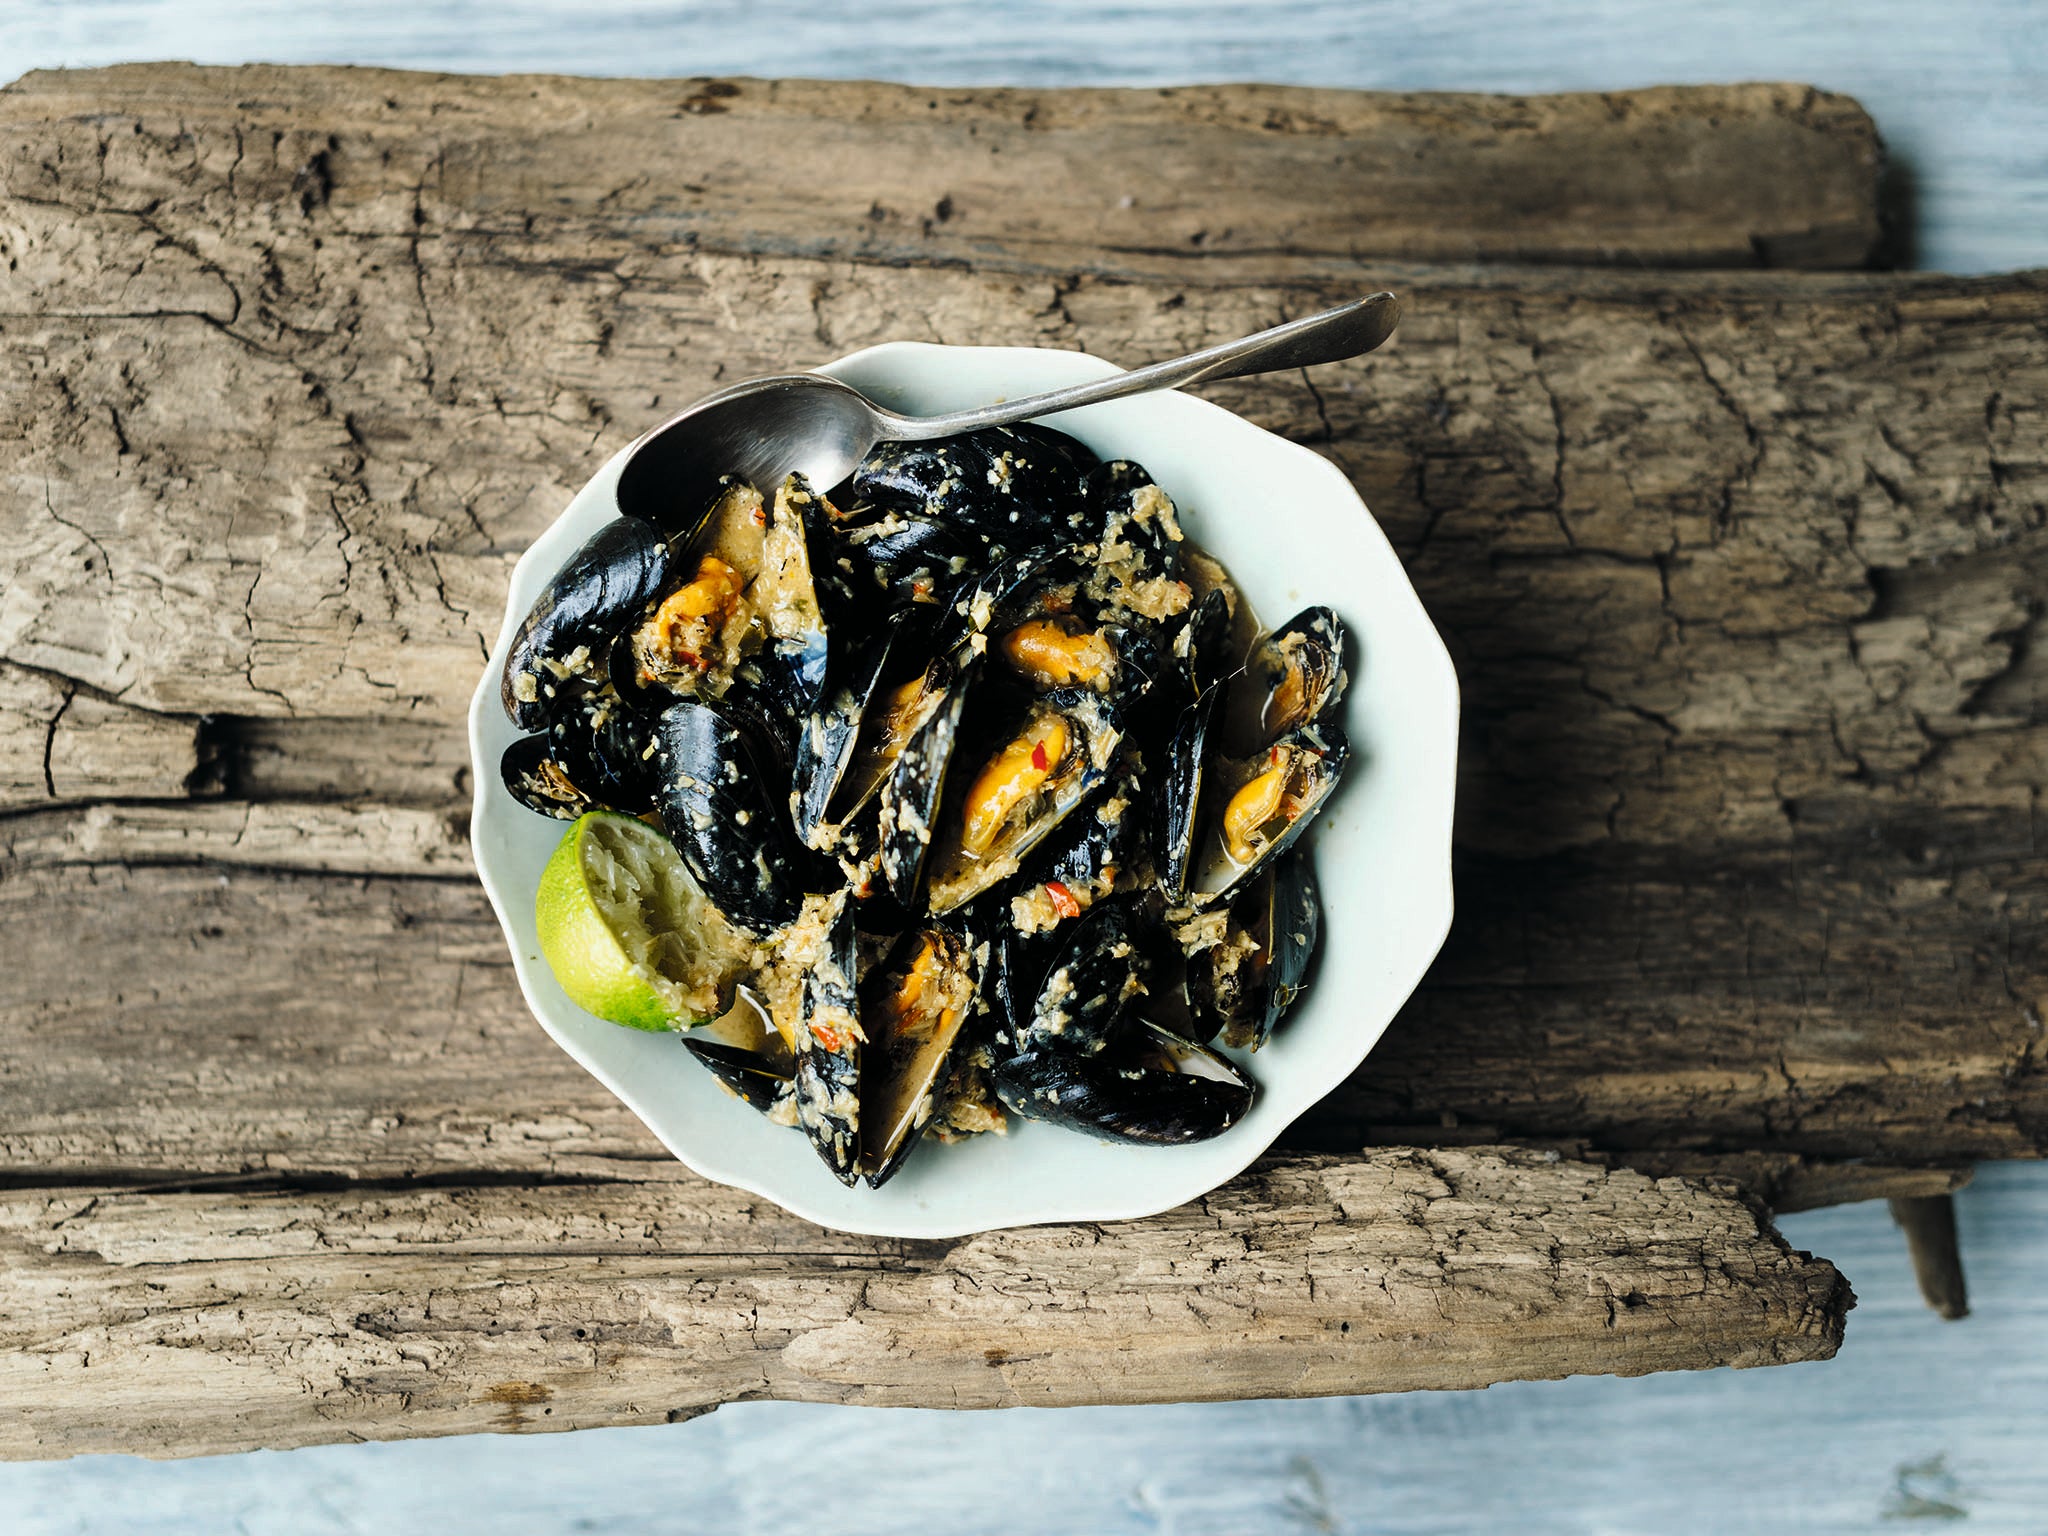
Cambodian curried mussels
Based on Cambodia’s legendary dish, fish amok – a creamy curry baked in a banana leaf basket, these mussels are fragrant with lime leaves, lemongrass and coconut. I first ate fish amok at the Friends International restaurant in Phnom Penh, a wonderful charity that provides street children with much-needed second chances by giving them vocational training in the cooking industry. Mussels do rather well with the wood-fired amok treatment, cooking really quickly and staying tender.
Serves 2-4
1 tbsp vegetable oil
1 x 400ml tin of coconut milk
2 tbsp fish sauce
1kg mussels, washed and de-bearded
Steamed rice, to serve (optional)
For the curry paste
6 kaffir lime leaves, fresh or frozen, roughly chopped
2-3 bird’s-eye chillies
3 cloves of garlic, roughly chopped
1 echalion (banana) shallot, roughly chopped
2-3cm piece of galangal (or fresh ginger), roughly chopped
1 stem of lemongrass, outer leaves discarded, inner ones chopped
Zest and juice of 1 lime
Salt and freshly ground black pepper
The oven should be around 320-340C. Put the lime leaves, chillies, garlic, shallot, galangal, lemongrass, lime zest and juice into a deep jug. Season with a little salt and plenty of black pepper and blitz to a purée, using a stick blender. Alternatively, whizz in a food processor.
Scoop into a bowl, cover and refrigerate until you are ready to cook – it will keep for a day or two if you want to get ahead. When you are ready to cook, put the oil into a deep frying pan and slide it into the oven to heat up for a minute. Stir in the curry paste and slide it back into the oven for 10 minutes, until fragrant.
Stir in the coconut milk and fish sauce, put the pan back into the oven and bring to the boil, about 5 minutes. Finally, tip in the mussels, tossing them in the sauce so they are coated. Cover the pan with a lid or a well tucked-in sheet of foil. Move the fire around with a metal peel, then slide the pan back into the oven on to the hot spot where the fire was. Cook for about 10 minutes, rotating the pan once or twice to make sure the mussels are cooking evenly. Take a peek when you think they are done – they should be all open. If not, re-cover and cook for a further couple of minutes.
Give the mussels a final quick stir in the sauce and serve while piping hot. Discard any mussels that haven’t opened up.
‘The Ultimate Wood Fired Oven Cookbook’ by Genevieve Taylor (Quadrille £15) Photography by Jason Ingram
Join our commenting forum
Join thought-provoking conversations, follow other Independent readers and see their replies
Comments
Bookmark popover
Removed from bookmarks